�裱�� �����ܤδ��ä���
�ǽ�������ID:mAmGC2NECQ 2010ǯ09��24��(��) 18:06:26����
������ 
- VisualC#��ư���ơ������ץ��������Ȥ�WPF�ץ��������Ȥ��äƤ����������ץ���������̾��LightPlayer�ˤ��ޤ�����
MainWindow.xaml���������
- App.xaml��StartupUri="MainWindow.xaml"��������
- MainWindow.xaml��MainWindow.xaml.cs���Ⱥ������
XAML���
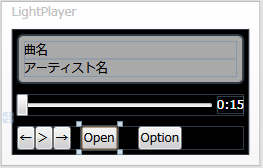
������������ɥ���MainWindow�Ȥ��ƺ������ơ�
MainWindow.xaml�˰ʲ��Τ褦�˽Ƥ���������ư����������ޤ�������ʤ�θ����ܤ��Ǥ��ޤ���
�ӥ�ɤ��Ƶ�ư�ޤdz�ǧ�Ǥ���Ϥ��Ǥ���
MainWindow.xaml�˰ʲ��Τ褦�˽Ƥ���������ư����������ޤ�������ʤ�θ����ܤ��Ǥ��ޤ���
�ӥ�ɤ��Ƶ�ư�ޤdz�ǧ�Ǥ���Ϥ��Ǥ���
<Window x:Class="LightPlayer.MainWindow"
xmlns="http://schemas.microsoft.com/winfx/2006/xaml/presentation"
xmlns:x="http://schemas.microsoft.com/winfx/2006/xaml"
Title="LightPlayer" Background="Black" SizeToContent="WidthAndHeight">
<StackPanel>
<Border CornerRadius="5" BorderThickness="2" Background="DarkGray"
Margin="5" Padding="5">
<StackPanel>
<TextBlock>��̾</TextBlock>
<TextBlock>�����ƥ�����̾</TextBlock>
</StackPanel>
</Border>
<DockPanel Margin="5">
<TextBlock Foreground="White" DockPanel.Dock="Right" VerticalAlignment="Center">0:15</TextBlock>
<Slider MinWidth="200"/>
</DockPanel>
<StackPanel Orientation="Horizontal" Margin="5">
<Button>��</Button>
<Button>��</Button>
<Button>��</Button>
<Button Margin="10,0">Open</Button>
<Button Margin="10,0">Option</Button>
</StackPanel>
</StackPanel>
</Window>
�����ä����������Τϡ��ե�������ѹ����뤿��Ǥ����ץ굯ư����MainWindow��ɽ������褦�˽�ľ��
	public partial class App : Application {
		protected override void OnStartup(StartupEventArgs e) {
			base.OnStartup(e);

			var window = new MainWindow();
			window.Show();
		}
	}
�ž夬�ꥤ���
�鿴�Ը�������ʥ�����١�
MSDN�Ȥ�����Ф��������狼��Ȼפ��ޤ�������ñ�˲���
- SizeToContent��Window��Height��Width�����ȤΥ������˹�碌�Ƥ����褦������
- Border��������Ȥ˴ݤߤ�������뤿��˻��ѡ���̾�ȥ����ƥ�����̾��ɽ�����뤿��γ������ΰ������
- StackPanel���夫���֤ˡʥܥ���Ȥ���ˤ����Ƥ�������Υѥͥ롣Orientation����ꤹ��Ⱥ����鱦���֤��Ƥ������Ȥ��Ǥ���
- DockPanel�� DockPanel.Dock�ǻ��ꤷ���岼�����Τɤ줫����ͤ�ƥ����ƥ���Ƥ����ѥͥ롣�Ǹ�����Ǥ��Ĥ���ΰ褹�٤Ƥ���Ѥ���Τ���ħ��
- Margin="10,0"�������Υޡ������10���岼�Υޡ������0�˻��ꡣ�岼�������٤Ƥ���̤˻��ꤷ�������Margin="10,8,6,4"�Τ褦�˻���Ǥ���

���Υڡ����ؤΥ�����
OuXh2p Im grateful for the article. Fantastic.
rOGppY <a href="http://hklxxcfgazdd.com/">hklxxcfgazdd</a>, [url=http://fmatposnqmhi.com/]fmatposnqmhi[/url], [link=http://ldbnjlpiixuf.com/]ldbnjlpiixuf[/link], http://fucxvtakovuh.com/