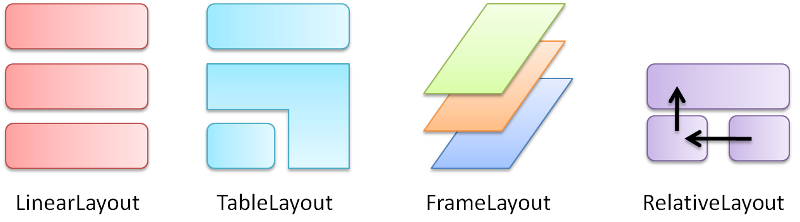
画面レイアウトの記述 
メイン画面のレイアウト定義ファイル(res/layout/main.xml)の編集
<?xml version="1.0" encoding="utf-8"?>
<LinearLayout xmlns:android="http://schemas.android.com/apk/res/android"
    android:layout_width="fill_parent"
    android:layout_height="fill_parent"
    android:orientation="vertical">
    <Button android:id="@+id/Button1"
            android:layout_width="fill_parent"
            android:layout_height="wrap_content"
            android:text="ダイアラー起動" />
<!-- -------------------------------------------------------------------------------- -->
<!-- ↓ここから -->
<!-- -------------------------------------------------------------------------------- -->
    <Button android:id="@+id/Button2"
            android:layout_width="fill_parent"
            android:layout_height="wrap_content"
            android:text="ブラウザ起動" />
<!-- -------------------------------------------------------------------------------- -->
<!-- ↑ここまで -->
<!-- -------------------------------------------------------------------------------- -->
    <Button android:id="@+id/Button3"
            android:layout_width="fill_parent"
            android:layout_height="wrap_content"
            android:text="画面遷移" />
</LinearLayout>
解説
・android:layout_width:  横の長さ
・android:layout_height: 縦の長さ
・fill_parent: 親の長さに合わせる
  => Android2.2より、match_parentに変更
     (引き続きfill_parentは使用可能)
・wrap_content: 内容の長さに合わせる

・レイアウトXMLからリソースを参照する方法: @リソースのタイプ/リソース名
  => リソースのタイプ
     string: 文字列
     color:  色
     dimen:  文字の大きさ
ブラウザ起動ボタンを押下した時の処理を追加
public class MainActivity extends Activity {
	/** Called when the activity is first created. */
	@Override
	public void onCreate(Bundle savedInstanceState) {
		super.onCreate(savedInstanceState);
		setContentView(R.layout.main);
		// ダイアラーボタンを押下したとき
		Button dialButton = (Button) findViewById(R.id.Button1);
		dialButton.setOnClickListener(new View.OnClickListener() {
			public void onClick(View v) {
				Intent intent = new Intent(Intent.ACTION_DIAL);
				// 電話番号を設定
				Uri uri = Uri.parse("tel:09012345678");
				intent.setData(uri);
				startActivity(intent);
			}
		});

		// ブラウザーボタンを押下したとき
//--------------------------------------------------------------------------------
//↓ここから
//--------------------------------------------------------------------------------
		Button browzerButton = (Button) findViewById(R.id.Button2);
		browzerButton.setOnClickListener(new View.OnClickListener() {
			@Override
			public void onClick(View v) {
				Intent intent = new Intent(Intent.ACTION_VIEW);
				Uri uri = Uri.parse("http://ecnavi.jp/");
				intent.setData(uri);
				startActivity(intent);
			}
		});
//--------------------------------------------------------------------------------
//↑ここまで
//--------------------------------------------------------------------------------
		// 画面遷移ボタンを押下したとき
	}
}
解説
setContentView
レイアウトXMLの中に記述された画面レイアウトをセットするという意味です。

画面を表示するためには、必ずレイアウトXMLが必須、というわけではありません。
レイアウトXMLを使わないで、Javaだけを使って画面レイアウトを記述することも可能です。
例えば、このような感じです。

Button bt = new Button(this);
bt.setText("ブラウザ起動");
setContentView(bt);
findViewById
ウィジェットを取得したいときは、Activityが持っている

View findViewById(int id)

というメソッドを使います。

引数としてウィジェットのIDを受け取って
そのIDによって識別されるウィジェットを戻り値として返します。
ただし、戻り値の型は、ウィジェットの種類ごとのクラスではなくて、

android.view.View

というスーパークラスですので、キャストすることが必要になります。

例)
ボタンのクラス名は

android.widget.Button

なので

Button dialButton = (Button) findViewById(R.id.Button1);

と書くことによって、dialButtonという変数に設定します。
イベントリスナーとは
ユーザーによる操作などによって生じる、ボタンがクリックされたというような出来事は、「イベント」 と呼ばれます。
ウィジェット上でイベントが発生したときに、そのイベントに応じた処理をするためには、
「イベントリスナー」と呼ばれるオブジェクトを作って、ウィジェットに設定しておく必要があります。

イベントリスナーは、「イベントが発生したときに呼び出されるメソッドを持っているオブジェクト」のことです。
イベントリスナーの作り方
イベントリスナーのインターフェースを実装したクラスを定義して、そのクラスのインスタンスを生成します。
クリックされたというイベントを処理するイベントリスナーは

android.view.View.OnClickListener

というインターフェースを実装して作ります。
このインターフェースが定義しているのは

void onClick(View v)

というメソッドです。
ウィジェットがクリックされたというイベントが発生すると、
このメソッドが呼び出されて、クリックされたウィジェットが引数として渡されます。
サブ画面の追加
SubActivityクラスの編集
public class SubActivity extends Activity {
//--------------------------------------------------------------------------------
//↓ここから
//--------------------------------------------------------------------------------
	@Override
	protected void onCreate(Bundle savedInstanceState) {
		super.onCreate(savedInstanceState);
		setContentView(R.layout.sub);
	}
//--------------------------------------------------------------------------------
//↑ここまで
//--------------------------------------------------------------------------------
}
サブ画面のレイアウトフィルを生成
サブ画面のレイアウト定義ファイルの編集
<?xml version="1.0" encoding="utf-8"?>
<LinearLayout
  xmlns:android="http://schemas.android.com/apk/res/android"
  android:orientation="vertical"
  android:layout_width="match_parent"
  android:layout_height="match_parent">
<!-- -------------------------------------------------------------------------------- -->
<!-- ↓ここから -->
<!-- -------------------------------------------------------------------------------- -->
<TextView
    android:id="@+id/textView01"
    android:layout_width="fill_parent"
    android:layout_height="wrap_content"
    android:text="サブアクティビティ画面に遷移しました" />
<!-- -------------------------------------------------------------------------------- -->
<!-- ↑ここまで -->
<!-- -------------------------------------------------------------------------------- -->
</LinearLayout>
マニュフェストファイルの編集
<?xml version="1.0" encoding="utf-8"?>
<manifest xmlns:android="http://schemas.android.com/apk/res/android"
      package="jp.co.test"
      android:versionCode="1"
      android:versionName="1.0">
    <uses-sdk android:minSdkVersion="8" />
    <application android:icon="@drawable/icon" android:label="@string/app_name">
        <activity android:name=".MainActivity"
                  android:label="@string/app_name">
            <intent-filter>
                <action android:name="android.intent.action.MAIN" />
                <category android:name="android.intent.category.LAUNCHER" />
            </intent-filter>
        </activity>
<!-- -------------------------------------------------------------------------------- -->
<!-- ↓ここから -->
<!-- -------------------------------------------------------------------------------- -->
        <activity android:name=".SubActivity"
                  android:label="@string/sub_activity_name">
        </activity>
<!-- -------------------------------------------------------------------------------- -->
<!-- ↑ここまで -->
<!-- -------------------------------------------------------------------------------- -->
    </application>
</manifest>
解説
package
アプリケーションのパッケージ名を完全修飾名で指定します。
これは以下の用途で利用されます。

■基準パッケージ名
コンポーネントのクラス名など、このパッケージからの相対パス名で記述できます。

■プロセス名
アプリケーションが実行するときのデフォルトプロセス名として使用されます。
uses-sdk
このアプリケーションがどのAndroid SDKで動作可能なのかを定義します。

■android:minSdkVersion
動作に必要なAPI Levelを整数で指定します。

■android:targetSdkVersion
このアプリケーションがターゲットとしているAPI Levelを整数で指定します。

■android:maxSdkVersion
このアプリケーションが動作する最大のAPI Levelを整数で指定します。
application
■android:icon
アプリケーションのデフォルトアイコンを指定します。
これはコンポーネント単位でも定義できます。

■android:label
アプリケーションのラベル名称を指定します。
activity
許可したいActivityのクラス名を指定します。
Androidは、デフォルトでは、全てのActivityの起動が拒否されています。
ここに記述したActivityクラスだけが許可されるという事です。
intent-filter
Activityの起動条件(フィルタ)を設定します。
この中に、action, category, dataの子要素を定義します。

■action
フィルタリングするアクションを定義します。
アクション名を定義します。Intent クラスに定義された定数が使えます。

■category
フィルタリングするカテゴリを定義します。
カテゴリ名を定義します。Intent クラスに定義された定数が使えます。

■data
フィルタリングするURIを定義します。
URIは、「scheme://host:port/path」で構成されます。
以下の属性が使用可能です。

android:host
ホスト名を指定します。
これは android:scheme が定義された場面でのみ有効です。

android:mimeType
MIME Type を指定します。* によるワイルドカードが使えます。

android:path
パスを指定します(完全一致となります)。

android:pathPrefix
パスの先頭部分を指定します。

android:pathPattern
パスを指定します(完全一致)。* によるワイルドカードが使えます。

android:
ポート番号を指定します。
これは android:scheme および android:host が定義された場面でのみ有効です。

android:scheme
スキーマを指定します。
"http" のように、コロンは付けずに指定します。
この値は必ず一つ以上指定して下さい。そうでないと、他の指定が有効になりません。
メイン画面のActivityクラスの修正
public class MainActivity extends Activity {
	/** Called when the activity is first created. */
	@Override
	public void onCreate(Bundle savedInstanceState) {
	         //////  中略  ////////

		// ブラウザーボタンを押下したとき
		Button browzerButton = (Button) findViewById(R.id.Button2);
		browzerButton.setOnClickListener(new View.OnClickListener() {
			@Override
			public void onClick(View v) {
				Intent intent = new Intent(Intent.ACTION_VIEW);
				Uri uri = Uri.parse("http://ecnavi.jp/");
				intent.setData(uri);
				startActivity(intent);
			}
		});
//--------------------------------------------------------------------------------
//↓ここから
//--------------------------------------------------------------------------------
		// 画面遷移ボタンを押下したとき
		Button activityButton = (Button) findViewById(R.id.Button3);
		activityButton.setOnClickListener(new View.OnClickListener() {
			public void onClick(View v) {
				Intent intent = new Intent(MainActivity.this, SubActivity.class);
				startActivity(intent);
			}
		});
//--------------------------------------------------------------------------------
//↑ここまで
//-------------------------------------------------------------------------------
	}
}
このページへのコメント
nx88BH Thanks so much for the blog.Really looking forward to read more. Really Great.
Z7b6hw <a href="http://uaiuolhbizct.com/">uaiuolhbizct</a>, [url=http://yqdwdrhhvubt.com/]yqdwdrhhvubt[/url], [link=http://ffbouxjbeezz.com/]ffbouxjbeezz[/link], http://azevlwcjfmaz.com/
amines excavators rectory
http://download.netsupport.notify.2.1.softwarenvm....
hQ7ZNw <a href="http://sbwnjobpvagb.com/">sbwnjobpvagb</a>, [url=http://djlivsvjvrez.com/]djlivsvjvrez[/url], [link=http://tlnlmsxamjot.com/]tlnlmsxamjot[/link], http://xtzfqcevqhxy.com/
http://fxpsblgloyfy.com/
HxQ96x <a href="http://ytbbwdtbroju.com/">ytbbwdtbroju</a>, [url=http://mlqvqdhdhgol.com/]mlqvqdhdhgol[/url], [link=http://jhyslwseyuee.com/]jhyslwseyuee[/link], http://itczyjzdubce.com/