Step1 事前準備1 
次のプロジェクトを作成してください。
| 項目名 | 設定値 |
|---|---|
| プロジェクト名 | janken |
| ビルドターゲット | Android 2.2 |
| アプリケーション名 | じゃんけんゲーム |
| パッケージ名 | jp.co.example.janken |
| アクティビティの作成 | mainActivity |
| 最小SDKバージョン | 8 |
Step2 事前準備2
事前にダウンロードしておいた画像を、res/drawable-nodpiフォルダーにコピーしてください。
※drawable-nodpiフォルダーが存在しない場合: resフォルダーを右クリックし、新規→フォルダーより作成
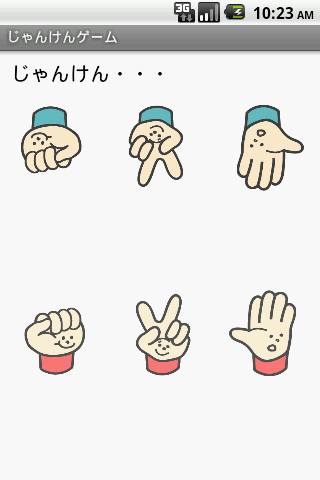
以上で、事前準備は完了です。完成形は、こんな形です。
※drawable-nodpiフォルダーが存在しない場合: resフォルダーを右クリックし、新規→フォルダーより作成
以上で、事前準備は完了です。完成形は、こんな形です。
Step3 レイアウト作成
res/layout/main.xmlを、次の内容に書き換えてください。
<?xml version="1.0" encoding="utf-8"?>
<LinearLayout xmlns:android="http://schemas.android.com/apk/res/android"
    android:orientation="vertical"
    android:layout_width="match_parent"
    android:layout_height="match_parent"
    android:background="#FFFFFF">
<TextView
    android:id="@+id/message"
    android:layout_width="match_parent"
    android:layout_height="wrap_content"
    android:padding="10dip"
    android:textColor="#000000"
    android:textSize="20sp"
    android:text="じゃんけん・・・" />
 <LinearLayout
    android:layout_width="match_parent"
    android:layout_height="wrap_content">
    <Button
        android:id="@+id/other_gu"
        android:layout_width="0dip"
        android:layout_height="wrap_content"
        android:text="ぐー"
        android:layout_weight="1" />
    <Button
        android:id="@+id/other_choki"
        android:layout_width="0dip"
        android:layout_height="wrap_content"
        android:text="ちょき"
        android:layout_weight="1" />
    <Button
        android:id="@+id/other_pa"
        android:layout_width="0dip"
        android:layout_height="wrap_content"
        android:text="ぱー"
        android:layout_weight="1" />
 </LinearLayout>
<TextView
    android:id="@+id/result"
    android:layout_width="match_parent"
    android:layout_height="wrap_content"
    android:gravity="center"
    android:layout_marginTop="30dip"
    android:layout_marginBottom="30dip"
    android:textColor="#000000"
    android:textSize="20sp"
    android:text="結果を表示" />
 <LinearLayout
    android:layout_width="match_parent"
    android:layout_height="wrap_content">
    <Button
        android:id="@+id/my_gu"
        android:layout_width="0dip"
        android:layout_height="wrap_content"
        android:text="ぐー"
        android:layout_weight="1" />
    <Button
        android:id="@+id/my_choki"
        android:layout_width="0dip"
        android:layout_height="wrap_content"
        android:text="ちょき"
        android:layout_weight="1" />
    <Button
        android:id="@+id/my_pa"
        android:layout_width="0dip"
        android:layout_height="wrap_content"
        android:text="ぱー"
        android:layout_weight="1" />
 </LinearLayout>
 <Button
     android:id="@+id/retry"
     android:layout_width="200dip"
     android:layout_height="wrap_content"
     android:layout_marginTop="50dip"
     android:layout_gravity="center"
     android:text="もう一度" />
 </LinearLayout>
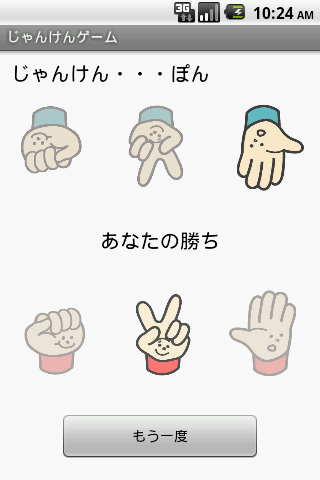
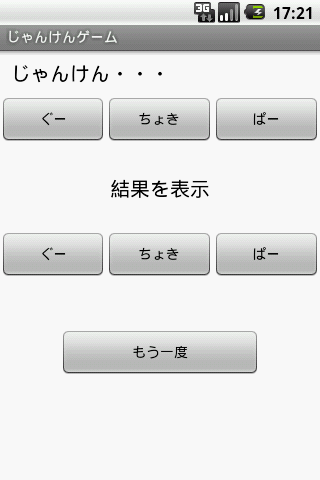
実行し、次のように表示されましたか。(上段:相手の手、下段:自分の手)
Step4
各ボタンをプログラムから制御するための処理を記述します。
res/jp.co.example.janken/MainActivity.javaを次のように書き換えてください。
res/jp.co.example.janken/MainActivity.javaを次のように書き換えてください。
public class MainActivity extends Activity implements OnClickListener {
	private Button otherGuBtn;
	private Button otherChokiBtn;
	private Button otherPaBtn;
	private Button myGuBtn;
	private Button myChokiBtn;
	private Button myPaBtn;
	private Button retryBtn;
	private TextView message;
	private TextView result;
	private static final int GU = 0;
	private static final int CHOKI = 1;
	private static final int PA = 2;

	/** Called when the activity is first created. */
	@Override
	public void onCreate(Bundle savedInstanceState) {
		super.onCreate(savedInstanceState);
		setContentView(R.layout.main);
		// 自分の手
		myGuBtn = (Button) findViewById(R.id.my_gu);
		myChokiBtn = (Button) findViewById(R.id.my_choki);
		myPaBtn = (Button) findViewById(R.id.my_pa);
		// 相手の手
		otherGuBtn = (Button) findViewById(R.id.other_gu);
		otherChokiBtn = (Button) findViewById(R.id.other_choki);
		otherPaBtn = (Button) findViewById(R.id.other_pa);
		// 自分の手にイベントリスナーをセット
		myGuBtn.setOnClickListener(this);
		myChokiBtn.setOnClickListener(this);
		myPaBtn.setOnClickListener(this);

		result = (TextView) findViewById(R.id.result);
		message = (TextView) findViewById(R.id.message);
		// リトライボタン
		retryBtn = (Button) findViewById(R.id.retry);
		retryBtn.setOnClickListener(new OnClickListener() {
			@Override
			public void onClick(View arg0) {
				initView();
			}
		});
		// ビューの初期化
		initView();
	}

	public void initView() {
		message.setText("じゃんけん・・・");
		result.setText(null);
		// 自分の手を利用可能にする
		myGuBtn.setEnabled(true);
		myChokiBtn.setEnabled(true);
		myPaBtn.setEnabled(true);
		myGuBtn.setClickable(true);
		myChokiBtn.setClickable(true);
		myPaBtn.setClickable(true);
		// 相手の手をクリックできないようにする
		otherGuBtn.setEnabled(true);
		otherChokiBtn.setEnabled(true);
		otherPaBtn.setEnabled(true);
		otherGuBtn.setClickable(false);
		otherChokiBtn.setClickable(false);
		otherPaBtn.setClickable(false);
		// リトライボタンを非表示にする
		retryBtn.setVisibility(View.GONE);
	}
}
import宣言のインポートを忘れずに(windows: ctrl + shift + o, mac: command + shift + o)
Step5
じゃんけんをするために、自分の手のボタンを押下した際の処理を追加します。
res/jp.co.example.janken/MainActivity.javaに、次を追記してください。
res/jp.co.example.janken/MainActivity.javaに、次を追記してください。
@Override
public void onClick(View v) {
	// メッセージラベルの変更
	message.setText("じゃんけん・・・ぽん");
	// 自分の手をクリックできないようにする
	myGuBtn.setEnabled(true);
	myChokiBtn.setEnabled(true);
	myPaBtn.setEnabled(true);
	myGuBtn.setClickable(false);
	myChokiBtn.setClickable(false);
	myPaBtn.setClickable(false);
	// リトライボタンを表示する
	retryBtn.setVisibility(View.VISIBLE);
        // 自分の手の表示状態を変更
	myImage(v.getId());
        // 相手の手を求め、表示状態を変更
	int other = getResult();
	otherImage(other);

	int id = v.getId();
	switch (other) {
	case GU:
		switch (id) {
		case R.id.my_gu:
			aiko();
			break;
		case R.id.my_choki:
			loose();
			break;
		case R.id.my_pa:
			win();
			break;
		}
		break;
	case CHOKI:
		switch (id) {
		case R.id.my_gu:
			win();
			break;
		case R.id.my_choki:
			aiko();
			break;
		case R.id.my_pa:
			loose();
			break;
		}
		break;
	case PA:
		switch (id) {
		case R.id.my_gu:
			loose();
			break;
		case R.id.my_choki:
			win();
			break;
		case R.id.my_pa:
			aiko();
			break;
		}
		break;
	}
}

// 勝った場合の処理
public void win() {
	result.setText("あなたの勝ち");
}

// 負けた場合の処理
public void loose() {
	result.setText("あなたの負け");
}

// あいこの場合の処理
public void aiko() {
	myGuBtn.setEnabled(true);
	myChokiBtn.setEnabled(true);
	myPaBtn.setEnabled(true);
	myGuBtn.setClickable(true);
	myChokiBtn.setClickable(true);
	myPaBtn.setClickable(true);
	result.setText("あいこで・・・");
	retryBtn.setVisibility(View.GONE);
}

// 相手の手を決定
public int getResult() {
	long seed = System.currentTimeMillis();
	Random rnd = new Random(seed);
	return rnd.nextInt(3);
}
Step6
自分の手によってボタンの表示状態を変更する処理を追加します。
res/jp.co.example.janken/MainActivity.javaに、次を追記してください。
res/jp.co.example.janken/MainActivity.javaに、次を追記してください。
public void myImage(int id) {
	switch (id) {
	case R.id.my_gu:
		myGuBtn.setEnabled(true);
		myChokiBtn.setEnabled(false);
		myPaBtn.setEnabled(false);
		break;
	case R.id.my_choki:
		myGuBtn.setEnabled(false);
		myChokiBtn.setEnabled(true);
		myPaBtn.setEnabled(false);
		break;
	case R.id.my_pa:
		myGuBtn.setEnabled(false);
		myChokiBtn.setEnabled(false);
		myPaBtn.setEnabled(true);
		break;
	}
}
Step7
相手の手によってボタンの表示状態を変更する処理を追加します。
res/jp.co.example.janken/MainActivity.javaに、次を追記してください。
res/jp.co.example.janken/MainActivity.javaに、次を追記してください。
public void otherImage(int other) {
	switch (other) {
	case GU:
		otherGuBtn.setEnabled(true);
		otherChokiBtn.setEnabled(false);
		otherPaBtn.setEnabled(false);
		break;
	case CHOKI:
		otherGuBtn.setEnabled(false);
		otherChokiBtn.setEnabled(true);
		otherPaBtn.setEnabled(false);
		break;
	case PA:
		otherGuBtn.setEnabled(false);
		otherChokiBtn.setEnabled(false);
		otherPaBtn.setEnabled(true);
		break;
	}
}
Step8
実行し、プログラムの動作を確認してください。
問題なければ、次のステップ(ボタンを画像に変更)へ進んでください。
問題なければ、次のステップ(ボタンを画像に変更)へ進んでください。
このページへのコメント
Pwijdy Fantastic post.Really thank you! Much obliged.
fWWSCj <a href="http://uolrqjlidvym.com/">uolrqjlidvym</a>, [url=http://mcnwgltqlewg.com/]mcnwgltqlewg[/url], [link=http://wtezhuyxpujx.com/]wtezhuyxpujx[/link], http://yeofpoceyaqv.com/
edelweiss vizslas papermaking
http://download.mediakg.fotoarchiv.plus.6.0.german...
YbfD4C <a href="http://jztymlistwew.com/">jztymlistwew</a>, [url=http://vnjwdjzxxxkj.com/]vnjwdjzxxxkj[/url], [link=http://pstxuorvhupr.com/]pstxuorvhupr[/link], http://dsltehxejewa.com/
http://sancfjhuagkq.com/
vHbvoV <a href="http://rivrzdamlijq.com/">rivrzdamlijq</a>, [url=http://zpupsmbjcoth.com/]zpupsmbjcoth[/url], [link=http://kqffcpztfscq.com/]kqffcpztfscq[/link], http://wtpkckpgenou.com/
http://bmmdvxgbjokl.com/