�������ڤ���λܹ�
Inspection of Sheet Pile Cofferdams during Construction
�������ڤ���ι�������
Roy Jorgenson
Roy Jorgenson and Associates
©2003 Pile Buck, Inc.
Basic Information
�����μ�
Cofferdams are temporary structures constructed to keep water and soil out of excavations in which bridge piers or other substructures are to be built. Usually, cofferdams are dewatered so that the substructures can be built under dry conditions. After the substructures have been completed, the cofferdams are removed.
���ڤ���ϡ����ο���ں�����������ä���Ƥ뤿��η���������ʤ��褦�ˤ��뤿��ˡ����Ū�˷��ߤ���ޤ������̤ϴ��������֤Ǵ��ä����Ƥ���褦�����ڤ��餫��夬ȴ����ޤ������ô���������ڤ���ϼ�������ޤ���
As an inspector, your task is to inspect the work done by the contractor during construction, dewatering and removal of cofferdams. One important point needs to be made at the start: a cofferdam is a tool of the contractor. He or she is responsible for its design and construction.
�������Ȥ��Τ��ʤ���̳��ϡ����ڤ���η��ߡ���ȴ�����������ʤɤλܹ��桢���λŻ������뤳�ȤǤ����Ϥ�ν��פʥݥ���Ȥϡ����ڤ���϶ȼԤˤȤäƻŻ��Ǥ��ꡢ�ȼԤˤ��߷ס��ܹ�����Ǥ������ޤ���
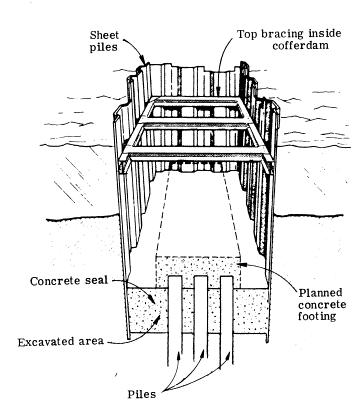
The diagram below shows some of the important parts of a cofferdam. We will discuss the construction and use of these parts and your inspection duties. The design of cofferdams will vary from project to project, but the basic functions shown here will be a part of every design.
���οޤ����ڤ���Τ����Ĥ��ν��פ���ʬ��ɽ���Ƥ��ޤ������λܹ�ˡ�䤳������ʬ�λȤ������ޤ����ʤ��θ�����̳�ˤĤ��Ƥϡ��Τ��ۤ��������ޤ��礦�����ڤ�����߷פϥץ��������ȡʷײ�ˤˤ�ä��͡��Ǥ�����������������Ƥ���褦�ʴ��ܵ�ǽ�Ϥɤ��߷פǤ�Ʊ���Ǥ��礦��
The design of a cofferdam is left to the contractor; however, this design can be subject to approval by the engineer. If the engineer requests a design review, the contractor must submit the working drawings for approval.
���ڤ�����߷פ��ڷ��ȼԤλŻ��Ǥ��������դξ�ǧ��ɬ�פʾ��⤢��ޤ����⤷���դ��߷פκƸ������ᤷ���ʤ�С��ڷ��ȼԤϾ�ǧ�Τ���˻ܹ��ޤ���Ф��ʤ��ƤϤ����ޤ���
The working drawings will show the type of cofferdam planned and the amount of clearance inside the cofferdam. This clearance is important; there must be enough room for the substructure to be built, including room for equipment and personnel. Additionally, the cofferdam must be deep enough to allow footing placement at the proper elevation. If you have questions about the working drawings or the size and depth of the cofferdam, ask your project engineer.
�ܹ��ޤϷײ褵�줿���ڤ���μ�������ڤ��������ζ��֤ι⤵�ʹ����ˤ��ޤ�����Ȱ��䵡���ޤ�ơ���¤�ʻܹ��ˤ˽�ʬ�ʹ��������ڤ��������ˤ��ᤵ��ޤ������ξ塢Ŭ�ڤʹ⤵�ǥա����ʴ��áˤ��ʤ����褦�ʽ�ʬ�ʿ�����ɬ�פǤ����⤷�⡢�ܹ��ޤ����ڤ�����礭���俼���˵��䤬����С����ĵ��դ˼��䤷�ޤ��礦��
Locating the Cofferdam
���ڤ���Ρ�¬�̡�����
It is the contractor��s responsibility to initially establish horizontal and vertical control. This is done by setting up reference points and benchmarks, either on land or adjacent structures. The contractor is responsible for transferring these controls to the cofferdam. This may be easy or hard depending upon how far away the cofferdam is from the reference points.
�Ϥ���˿�ʿ����ľ������¬�̴����Ω���뤳�Ȥ��ڷ��ȼԤ���Ǥ�Ǥ������κ�Ȥϡ��Ͼ�ޤ��϶��ٷ���ʪ��¬���ȴ���������ꤷ�ƹԤ��ޤ����ޤ��ڷ��ȼԤ���Ǥ�Ȥ��ơ�����¬�̴������ڤ���˰�ư���뤳�Ȥ��������ޤ������κ�Ȥ����٤ϡ�������������ڤ���ޤǤε�Υ�ˤ�äưۤʤ�ޤ���
Once the foundation and sheet piles are driven, the contractor will establish permanent points on the sheet piling or bracing. These points may be either painted or scratched on the material, but any points should be marked so that you can easily read them. These reference points are important; they give you the information needs to check:
���ä����Ĥ��Ǥ����ȡ��ڷ��ȼԤϡ����Ĥ⤷���ϥ֥졼���˱ʵ�Ū��¬�����ߤ��ޤ���������¬�����ɤ�������褦�ˡ�����˥ڥ���Ȥ��뤫����Ĥ��Ƽ�����ޤ����ޤ�������¬���ϼ��Τ褦�ʳ�ǧ���٤�ɬ����������뤿��ˤ���פǤ���
• Alignment of the template (sometimes spelt template) for the piles and footing;
• Dimensions of the excavation and the footing; and Elevations of the piles, the seal and the footing.
Once the footing is in place, the reference points can be transferred to a point on the footing, from which the remaining structure elevations and dimensions can be checked.
�ա������ߤ�����ȡ�¬���ϻĤ�ι�¤ʪ�ι⤵����ˡ���ǧ�Ǥ���ա�����˰�ư����뤳�Ȥ⤢��ޤ���
General Sequence
���ܽ��
Before describing the inspection of specific steps of cofferdam work, we will deal with the basic sequence of the work. These steps may vary from project to project, but for our purposes they will serve as a typical example. These steps are as follows:
���ڤ���ξܺ٤ʸ�����Ȥ������������ˡ����δ���Ū�ʼ��ˤĤ����������ޤ��礦�������μ��ϥץ��������ȡʷײ�ˤˤ�ä��͡����⤷��ޤ����ʤ�����̤Ȥ��ơ�ŵ��Ū����Ȥ����������ޤ������ϰʲ��Τ褦�ˤʤ�ޤ���
1. Temporary piles are driven to hold the template for the cofferdam.
�������ڤ�������Ȥߤ�����뤿����Ū�ʹ����Ǥ��ޤ���
2. The template is set on the temporary pile. This template can be remain in the cofferdam as bracing.
�������Ȥߤϰ��Ū�ʹ��ξ�����֤��ޤ����������Ȥߤϥ֥졼���ʶڰ㤤�ˤȤ������ڤ���˻Ĥ����Ȥ����ޤ���
3. Sheet piles are set in place and driven. The sheet piles will be placed around the template or bracing that will hold them in position.
�������Ĥ����ξ������ߤ��ޤ������ĤϤ����ٻ�����֥졼�������Ȥߤμ�������֤��ޤ���
4. The foundation pit is excavated inside the cofferdam. If needed, excavation will go beyond plan grade if unsuitable material is encountered. Suitable materials will be used as backfill.
�������÷�����ڤ���������˷��路�ޤ����ʷ�������ǡ���Ŭ�����ڤ����Ĥ��ä���硢�ײ�ʾ�˷��路�ޤ���Ŭ�����ڤ�����ᤷ�˻Ȥ��ޤ���
5. Foundation piles are driven, using the top ring of bracing as a template for spacing and positioning. After pile driving, more excavation may be needed. If a foundation pile tip��s elevation is higher than the cofferdam sheet pile tips, notify the geotechnical engineer.
�����֥졼���Υȥåץ��ֳ֤���֤�����Τ����Ѥ��ʤ��鹺���Ǥ��ޤ��������߸�ˤϤ���ʤ뷡�郎ɬ�פˤʤ뤫�⤷��ޤ��⤷����ù���ü�ι⤵����������ü�ι⤵����⤱��С��ϼ����ص��Τ����Τ��ޤ��礦��
6. The concrete seal is placed on the bottom of the foundation pit. The concrete is placed underwater to form a seal, which keeps the water from seeping through the foundation.
�������÷����˥���ȥ�����ޤ����夬���äˤ��߽Ф�Τ��ɤ��������������륳��Ȥ��������ߤ��ޤ���
7. The cofferdam is dewatered (pumped dry) so that work can begin on the substructure.
�������äι������Ϥ����褦�ˡ����ڤ��餫����ȴ���ޤ���
8. When the substructure is completed, the cofferdam is flooded and sheet piling is extracted.
�������ä��������������Ĥ��곰�����ڤ���˿������ޤ���
They are illustrated in the following drawings.
�ʲ��οޤͤˤ��Ʋ�������

Placing Steel Sheet Piles
�����Ĥ�����
Materials
����
Most cofferdams are constructed of steel sheet piles. Steel offers the most strength and durability—and it can be removed and used again. The type of steel sheet piles used is up to the contractor, but you should be familiar with the characteristics of the piling. Most sheet piles are the deep-arch types that interlock as shown below:
�ۤȤ�ɤ����ڤ���ˤϹ����Ĥ��Ȥ��Ƥ��ޤ������ݤϤ�äȤ���ѵ����ˤ����졢������������Ѥ��ǽ�Ǥ����ɤμ�����Ĥ�Ȥ������ڷ��ȼԤˤ��ޤ��������ʤ��⤽�ι��Ǥ�����ħ�ˤĤ��Ƥ褯�ΤäƤ����٤��Ǥ��礦���ۤȤ�ɤ����Ĥϲ��οޤΤ褦��Ϣ�뤹��ʿ����˥����������פǤ���

You will have to make a few checks on the piles both before and during installation:
������Ȥ������ˤ����Ĥ��γ�ǧ��ɬ�פǤ���
· Check the sizes of the steel sheet piles. They must be long enough and have the dimensions shown on the working drawings.
· Check for crimped flanges or damaged interlocks. On regular steel H-piles, minor damage will not affect the driving or strength of the piles, but on steel sheet piles, even small crimps or bends can make driving and interlocking difficult and dangerous.
· Check the handling holes and other openings in the sheets. All holes that will be below the water level must be plugged or welded so that the cofferdam will remain dry after it is dewatered.
It is a good idea to check the steel sheet piles before installation, since damage can occur during storage and handling.
�ݴ���䱿�����»����ȯ�����뤳�Ȥ⤢��Τǡ��������˹����Ĥ����뤳�Ȥ����ᤷ�ޤ���
Setting and Driving
���֤�����
The most important step in setting and driving sheet piles is the construction of a well-built guide structure. In many cases, the guide structure may be a top level of bracing that is constructed between struts—extended foundation piles.
���Ĥ����֤����ߤǤ�äȤ���פʼ��ϡ��ɤ��Ǥ���Ƴ�ʥ����ɡ˹�¤�λܹ��Ǥ���¿���ξ�硢����ʱ�Ĺ���ù��ˤδ֤����֤��줿�֥졼��������Ƴ��¤�ˤʤ�ޤ���
First, a few struts are driven around the perimeter of the planned cofferdam. These piles will extend above the water level. After this, a bracing framework is set up between these struts. This guide structure should be checked for proper location.
�ޤ������ܤλ����ײ褵�줿���ڤ���μ��Ϥ��Ǥ��ޤ��������ι��Ͽ��̾�ޤDZ�Ĺ����ޤ������θ塢����δ֤˥֥졼�����Ȥߤ�ܹ����ޤ�������Ƴ��¤��Ŭ�ڤʾ�ꤢ�뤫��ǧ����٤��Ǥ���
There may be a need for more than one guide structure. When the top bracing is placed after the sheet piles are driven, a temporary inside guide frame may be used. Alternatively, if the sheet piles extend much higher than the water level, a guide frame may be place on top of the bracing.
��İʾ��Ƴ��¤��ɬ�פˤʤ���⤢��ޤ����������߸�ξ����֥졼�����ֻ��ˡ������ΰ��Ū�ʥ����ɥե졼���Ƴ���ȡˤ����Ѥ������⤢��ޤ����ޤ��ϡ����Ĥ���̤��⤺�äȹ⤤��硢�����ɥե졼���֥졼���ξ��������֤��뤳�Ȥ⤢��ޤ���
As mentioned earlier, the actual construction of the cofferdam—including setting and driving the sheet piles—is the responsibility of the contractor. Still, you should be familiar with the work. Some of the important steps are listed below:
���˽Ҥ٤��褦�ˡ����Ĥ����֤����ߤ�ޤ����ڤ���λܹ��ϡ��ڷ��ȼԤ���Ǥ�Ǥ��������ʤ��⤽�λŻ��ˤĤ����ɤ��ΤäƤ����٤��Ǥ��礦�������Ĥ��ν��פʼ��ϰʲ����ͤˤʤ�ޤ���
· The entire cofferdam should be set in place before the bulk of the driving is done.
· Setting should begin at one corner and continue around the cofferdam. Some of the sheet piles may need to be driven more, so that the structure will hold in place. Be sure the corners are vertical and placed in the right locations. This will ensure the proper positioning of the remaining sheet piling.
· All of the sheet piles must be set vertically. The corners are more rigid and the walls will adjust to fit them. This is why it is especially important to keep the corners vertical. If any piles begin to lean, they should be reset.
· The actual driving of the sheet piles should be done a few feet at a time, working around the cofferdam and driving the sheet piles at approximately the same time.
Cofferdam construction procedures will vary from one contractor to another.
���ڤ���λܹ������ڷ��ȼԤˤ�ä��͡��Ǥ���
Length and Penetration
The proper length and penetration of the steel sheet piles in the cofferdam will be shown on the working drawings. You will not need to compute bearing or check blow counts, but you should inspect the final driven sheet piles for some general conditions:
· If the cofferdam is to be dewatered, the sheet piles must be driven to sufficient depth to insure a dry seal. Additionally, it must have adequate bracing to keep it from collapsing under water pressure.
· No matter how deep a sheet pile is to be driven, it must have enough bearing capacity to support the weight of the pile, the top brace or other guide frames, and other construction equipment.
· Cofferdams must not tilt or move laterally during driving. If they do, they must be righted or enlarged to provide the necessary clearance.
· Welding at interlocks should be avoided where possible. If welding is done, however, no welding material should be placed inside the interlock. Otherwise, free movement will be blocked.
Excavating the Cofferdam
After the steel sheet piling for the cofferdam has been set and driven, the foundation pit must be excavated to allow the placement of the footing at the proper depth. As an inspector, you have two tasks here:
· You must check the final depth of the excavation.
· You must inspect the excavated material.
Checking Final Depth
The contractor must excavate inside the cofferdam to a level bottom. To insure this is done, you must take soundings along the bottom when excavation is complete.
Soundings
Soundings are measurements to the cofferdam floor taken from above the water level. The cofferdam will not be dewatered as of yet, so you will have to measure through the water. To do this, do the following:
1. Select or prepare a suitable sounding device. This can be as simple as a heavy weight attached to a cloth tape, or a long piece of marked pipe or an extendable metal tube. This size and type of the material will depend upon the water depth and available device.
2. Establish a known elevation reference point and mark it. This point can be located most easily on the top bracing or guide frame. The surface of the water inside the cofferdam can be used as a reference if the soundings are taken at once.
3. Drop the sounding device into the cofferdam and lower it to the bottom. Be sure that the bottom is reached. If cloth tape is being used, lower it slightly more, then pull up until you feel it just pick up the weight.
4. Note the measurement on the tape or pipe and subtract it from the elevation reference point, to get the bottom elevation.
These are illustrated in the diagram below.
Field Books
You will need to take many soundings over the floor of the cofferdam so an accurate check can be made. By setting up a grid system in a field book, you can make a systematic check over the entire bottom. A sample grid is shown below.
The top number is the original sounding (the measurement from the reference point down to the bottom of the cofferdam.) The second reading is the sounding down to the top of the concrete seal. We will discuss the second soundings below.
Inspecting Excavated Material
As the foundation pit is excavated, you should inspect the material being removed. If suitable is reached, then the contractor need only excavated to the required depth.
If the material at the planned depth is unsuitable, such as muck or other organic material, then other actions must be taken. You should inform your project engineer so that he or she can tell you the proper procedures to be followed. Usually, the unsuitable material must be undercut to a specified depth and then select backfill material must be placed on the floor of the cofferdam. This select backfill will provide a suitable bed for the seal.
There are a few other things you will have to inspect during excavation:
1. You must be sure that no excavation is done outside the cofferdam unless ordered by the project engineer.
2. If excavation is done before the cofferdam is sunk, the contractor must backfill these materials to the original ground line after the foundation is in place.
3. Materials excavated from the foundation excavation must be disposed of properly—away from the water area—and not be allowed to filter back into the water. The disposal of any materials must comply with all applicable regulations and laws.
Driving Cofferdam Foundation Piles
After the foundation pit inside the cofferdam is excavated and backfilled, foundation piles must be driven, if needed. Your basic duties as an inspector will be no different than those for regular foundation piles—you will have to check the piles when they are delivered, inspect the pile driving operations, determine and record when bearing is reached and check the final pile elevations. However, you will have some additional duties, since driving piles underwater creates some special problems. In this section we will discuss:
· Using a template for pile driving; and
· Using ��followers�� to drive piles.
Setting Bracing and Template
The first step in preparing for pile driving is to set the bracing for the cofferdam sheet piling. The contractor��s working drawings will give the details of the bracing plan he or she is going to use. The contractor is responsible for the bracing system, although the engineer may request approval of his or her design. You should be aware of some of the factors that affect design:
· Location of piles;
· Elevation of construction joints in the planned pier;
· Elevation of the construction seal;
· High-tide level; and
· Plan dimensions of the footing and pier.
The most important point is that the bracing should not interfere with the remaining construction work or pile driving. In particular, the bracing should be designed to facilitate pier construction and form removal.
Usually, the top ring of the bracing will serve as a template for pile driving. The template acts as a reference from which pile locations can be easily determined. By establishing a reference point for elevation and alignment, you can easily check the pile driving work.
A plan view of the bracing and template is shown below. Note that the template frames the footing and planned pile locations.
Driving Foundation Piles
Alignment
As an inspector, you must check the alignment and spacing of the foundation piles as they are driven. As we saw earlier, the template will aid you in this check. An established reference point should be marked on the template. From this, you will need to:
1. Measure along the template to locate where the piles should be driven; and
2. Check the spacing between the piles as they are being driven.
As the piles are being driven, you can also check vertical alignment by using the top of the template as a reference line.
Followers
A follower is a steel pile extension used to drive the pile below the reach of the hammer. A follower is placed between the foundation pile and the hammer, so that the pile can be driven inside the cofferdam, underwater, to the proper elevation. The contractor will design his or her own follower, but there are some general guidelines you should know:
· The follower must be rugged enough to withstand repeated blows. To insure this, reinforcement of some kind may be needed at both ends of the follower.
· The follower must be able to transmit full force of the hammer without deflecting. If you see the follower deflect during pile driving, be sure the contractor stop driving and replaces the follower.
· The guides for the follower and pile must be designed so that the proper alignment will be maintained.
The diagram below shows the use of the follower.
Driving
When driving piles with a follower, the first pile shall be longer and driven without the follower. This evaluates the performance of the follower and aides in establishing the driving criteria. These driving criteria are then established by the geotechnical engineer.
Elevation
Your final step in pile driving is to check the pile elevation. The proper elevation will be shown on the plans. In order to make this check, first you will need to mark the follower, in feet. Then you can read the penetration depth at the reference point on the template.
For instance, if the elevation of the reference point on the template is 100.00 feet and the follower is driven to the 50-foot mark on the follower, then the tip (or toe) of the foundation pile is at an elevation of 50.00 feet.
You will have one other job after all the piles are driven: take surroundings on the foundation. The grade may have risen due to the piles displacing the soil. If the foundation is above the planned grade, then the contractor will have to excavate back to proper grade.
If a foundation pile tip��s elevation is higher than the tips of the cofferdam��s sheet piling, notify the geotechnical engineer.
Placing the Concrete Seal and Dewatering
The cofferdam is nearly complete, but before work can begin inside the cofferdam, the water has to be removed. If dewatering is done without sealing the bottom, the water will rise through the bottom and fill the cofferdam. For this reason, a concrete seal is placed on the cofferdam floor prior to dewatering.
In this section we will discuss concrete seals and dewatering, and the things you will have to inspect. You will have some important inspection duties, so be sure to study this section carefully. Without a proper seal, the cofferdam will be useless and dangerous.
Placing the Concrete Seal
Concrete foundation seals are used when cofferdams cannot be pumped dry. The concrete seals are poured after the piles have been driven. After the seals have been set underwater, the cofferdams are dewatered and the footings are constructed on top of the dry seals.
Since underwater placement is necessary for the construction of foundation seals in cofferdams, you as inspector will have the following responsibilities:
· Review the contractor��s plan of operation.
· Inspect and measure the foundation excavation just before concrete placement.
· Be sure that reference elevations are set on the cofferdam. Reference elevations are necessary to determine the elevation of the concrete that has been placed.
· Be sure that the concrete does not flow through the water. To insure this, the contractor may follow certain steps when placing the tremie underwater:
o Place the empty tremie in the water.
o Place a bundle of burlap or similar material in the tremie.
o Place the concrete in the tremie, so that the burlap will be forced through the tremie, keeping the water from mixing with the concrete.
· Be sure that the hopper is full when moving the tremie pipe. If the tremie pipe is empty—��loses its prime��—then water will enter the tremie pipe. Only when the hopper is full can it be assumed that the tremie pipe is full.
· Be sure that the lower end of the tremie pipe is buried in fresh concrete at all times. If the prime is lost, replace the burlap procedure.
· The tremie pipe shouldn��t be moved by more than 5 or 6 feet at a time. The tremie pipe and hopper must be full as they are moved across the seal.
· Check the location of the top of the seal frequently by taking sounding with a flat, 6-inch diameter sounding device.
· Be sure that the top of the concrete is kept horizontal.
· Be sure that no one vibrates, spaces or tamps the concrete or attempts to level the surface with any tool.
· Be sure that dewatering is not started until the concrete has set sufficiently—and in no case less than 72 hours. After the cofferdam is dewatered, the loose soft laitance and other foreign materials should be removed. If the seal is too high in places, then the contractor must chip the concrete to obtain a horizontal surface.
· If the water level outside the cofferdam is apt to rise due to storms, be sure that the cofferdam is vented so that the water level inside the cofferdam is the same as that outside. When dewatering is begun, these vents must be plugged.
A common construction practice is to slope the concrete seal so that a low area is created at one corner of the cofferdam. The low area will allow the water to be pumped out thoroughly.
These concepts are illustrated in the diagram below.
Pumping
Pumping to dewater a sealed cofferdam must not commence until the seal has set sufficiently to withstand the hydrostatic pressure, and in no case earlier than 72 hours after placement of the concrete.
Those are the specified requirements, but how is pumping accomplished? Usually, large temporary pumps are used to pump out a cofferdam initially, and smaller automatic pumps are then used to keep it dry. It is important to have a large pump capacity in initial dewatering, since leakage through the sheet piles will be excessive until the sheet-pile interlocks tighten up under pressure. Several large pumps are normally required to give a satisfactory rate of dewatering.
After the cofferdam has been dewatered, a few small pumps can be used to keep it dry. These pumps are economical in their operation and, being float operated, will automatically control the water level. It's a good idea for the Contractor to have standby pumps in case the main pump fails.
It may be desirable to construct a tide gate in a cofferdam. This is usually done during the driving of the steel sheet piles by burning off one pile at the low-water line. The top section of this pile can then be raised a few feet to open the gate. By leaving this gate open during construction of the cofferdam, unbalanced pressures are avoided. Without the tide gate, the water will still fill up inside the cofferdam to the high-tide level but, as the tide starts to fall, the drop in the inside water level will occur at a slower rate. The unbalanced levels produce an outwardly directed pressure for which few cofferdams are designed.
When the cofferdam is ready for dewatering, the tide gate is left open until low tide. As the tide starts to rise, the gate is closed and welded shut. All available pumping capacity is then thrown into action. This has been found to be the best and sometimes the only way in which a start can be made on dewatering.
Sealing Leaking Joints
Most well built cofferdams will not leak excessively after this start in dewatering has been accomplished.
The more rigid and heavily braced cofferdams generally leak more than flexible cofferdams, because in the latter case the interlocks are very tight under stress. This can be taken care of with a slightly larger pump capacity.
If excessive leakage through the interlocks is encountered, there are several techniques for reducing the flow. Often some filler material is dropped through the water just outside the sheet piles so that the inflowing water will suck it into the interlocks. Some of the mixtures which have been used are sand and sawdust; cement and sand; and cinders. On cofferdams that leak excessively, weighted canvas sheets can be draped on the outside of the sheet piles. A diver can place sandbags at the bottom to hold the canvas against the sheet piles.
Serious leaks can occur where sheet piles have been driven out of interlock, and corrective measures are time consuming and expensive. Usually the fact that a sheet pile has been driven out of the interlocks is not known until efforts to pump down have been unsuccessful. A diver can then be sent down to inspect the interlocks but, since any opening is usually at or near the inside bottom, it may be hard to find. Under some conditions, a coloured dye in the outside water might help locate the bad spot. In some cases cofferdams have been successfully dewatered, then they blow at the location of a gap.
Once a leaking spot has been definitely located, corrective measures can be started. One method is to drive a "blister" of two or three sheet piles on the outside. A gasket of some soft material is then used to seal the new piles against the old wall, or a diver can drive wedges. Where possible, the solid inside this blister is excavated down to the level of the bottom of the concrete seal, and the blister is then filled with tremie concrete. In some special cases the gap can be satisfactorily sealed by a diver driving wedges directly and placing canvas on the outside. This method is effective only where the seal on the inside comes up above the mud line on the outside. A temporary patch may be made by a diver using underwater quick-setting hydraulic cement.
Grading The Seal
Your final inspection job will be to check the grade of the finished concrete seal. You can do this before or after dewatering. You will need to use the grades that you recorded when you took the final excavation soundings.
The soundings that you take on the concrete seal should be at the same locations as for the final excavation. Again, use the same grid, the same intersections and the same reference point on the cofferdam or template. It is important that you are sure that the same reference point is used. Otherwise, the concrete seal grades cannot be used to determine the amount of concrete in the seal.
You must document all soundings in your field book, as shown below. Later this information can be used to determine pay quantities.
If the soundings indicate high spots in the seal, the contractor will have to chip off these spots, so that the seal is as level as possible.
�������ڤ���ι�������
Roy Jorgenson
Roy Jorgenson and Associates
©2003 Pile Buck, Inc.
Basic Information
�����μ�
Cofferdams are temporary structures constructed to keep water and soil out of excavations in which bridge piers or other substructures are to be built. Usually, cofferdams are dewatered so that the substructures can be built under dry conditions. After the substructures have been completed, the cofferdams are removed.
���ڤ���ϡ����ο���ں�����������ä���Ƥ뤿��η���������ʤ��褦�ˤ��뤿��ˡ����Ū�˷��ߤ���ޤ������̤ϴ��������֤Ǵ��ä����Ƥ���褦�����ڤ��餫��夬ȴ����ޤ������ô���������ڤ���ϼ�������ޤ���
As an inspector, your task is to inspect the work done by the contractor during construction, dewatering and removal of cofferdams. One important point needs to be made at the start: a cofferdam is a tool of the contractor. He or she is responsible for its design and construction.
�������Ȥ��Τ��ʤ���̳��ϡ����ڤ���η��ߡ���ȴ�����������ʤɤλܹ��桢���λŻ������뤳�ȤǤ����Ϥ�ν��פʥݥ���Ȥϡ����ڤ���϶ȼԤˤȤäƻŻ��Ǥ��ꡢ�ȼԤˤ��߷ס��ܹ�����Ǥ������ޤ���
The diagram below shows some of the important parts of a cofferdam. We will discuss the construction and use of these parts and your inspection duties. The design of cofferdams will vary from project to project, but the basic functions shown here will be a part of every design.
���οޤ����ڤ���Τ����Ĥ��ν��פ���ʬ��ɽ���Ƥ��ޤ������λܹ�ˡ�䤳������ʬ�λȤ������ޤ����ʤ��θ�����̳�ˤĤ��Ƥϡ��Τ��ۤ��������ޤ��礦�����ڤ�����߷פϥץ��������ȡʷײ�ˤˤ�ä��͡��Ǥ�����������������Ƥ���褦�ʴ��ܵ�ǽ�Ϥɤ��߷פǤ�Ʊ���Ǥ��礦��
The design of a cofferdam is left to the contractor; however, this design can be subject to approval by the engineer. If the engineer requests a design review, the contractor must submit the working drawings for approval.
���ڤ�����߷פ��ڷ��ȼԤλŻ��Ǥ��������դξ�ǧ��ɬ�פʾ��⤢��ޤ����⤷���դ��߷פκƸ������ᤷ���ʤ�С��ڷ��ȼԤϾ�ǧ�Τ���˻ܹ��ޤ���Ф��ʤ��ƤϤ����ޤ���
The working drawings will show the type of cofferdam planned and the amount of clearance inside the cofferdam. This clearance is important; there must be enough room for the substructure to be built, including room for equipment and personnel. Additionally, the cofferdam must be deep enough to allow footing placement at the proper elevation. If you have questions about the working drawings or the size and depth of the cofferdam, ask your project engineer.
�ܹ��ޤϷײ褵�줿���ڤ���μ�������ڤ��������ζ��֤ι⤵�ʹ����ˤ��ޤ�����Ȱ��䵡���ޤ�ơ���¤�ʻܹ��ˤ˽�ʬ�ʹ��������ڤ��������ˤ��ᤵ��ޤ������ξ塢Ŭ�ڤʹ⤵�ǥա����ʴ��áˤ��ʤ����褦�ʽ�ʬ�ʿ�����ɬ�פǤ����⤷�⡢�ܹ��ޤ����ڤ�����礭���俼���˵��䤬����С����ĵ��դ˼��䤷�ޤ��礦��
Locating the Cofferdam
���ڤ���Ρ�¬�̡�����
It is the contractor��s responsibility to initially establish horizontal and vertical control. This is done by setting up reference points and benchmarks, either on land or adjacent structures. The contractor is responsible for transferring these controls to the cofferdam. This may be easy or hard depending upon how far away the cofferdam is from the reference points.
�Ϥ���˿�ʿ����ľ������¬�̴����Ω���뤳�Ȥ��ڷ��ȼԤ���Ǥ�Ǥ������κ�Ȥϡ��Ͼ�ޤ��϶��ٷ���ʪ��¬���ȴ���������ꤷ�ƹԤ��ޤ����ޤ��ڷ��ȼԤ���Ǥ�Ȥ��ơ�����¬�̴������ڤ���˰�ư���뤳�Ȥ��������ޤ������κ�Ȥ����٤ϡ�������������ڤ���ޤǤε�Υ�ˤ�äưۤʤ�ޤ���
Once the foundation and sheet piles are driven, the contractor will establish permanent points on the sheet piling or bracing. These points may be either painted or scratched on the material, but any points should be marked so that you can easily read them. These reference points are important; they give you the information needs to check:
���ä����Ĥ��Ǥ����ȡ��ڷ��ȼԤϡ����Ĥ⤷���ϥ֥졼���˱ʵ�Ū��¬�����ߤ��ޤ���������¬�����ɤ�������褦�ˡ�����˥ڥ���Ȥ��뤫����Ĥ��Ƽ�����ޤ����ޤ�������¬���ϼ��Τ褦�ʳ�ǧ���٤�ɬ����������뤿��ˤ���פǤ���
• Alignment of the template (sometimes spelt template) for the piles and footing;
- ���ȥա����Τ�������Ȥ�(������)����
• Dimensions of the excavation and the footing; and Elevations of the piles, the seal and the footing.
- ����ȥա�������ˡ���ա����������뤪��ӹ��ι��١�
Once the footing is in place, the reference points can be transferred to a point on the footing, from which the remaining structure elevations and dimensions can be checked.
�ա������ߤ�����ȡ�¬���ϻĤ�ι�¤ʪ�ι⤵����ˡ���ǧ�Ǥ���ա�����˰�ư����뤳�Ȥ⤢��ޤ���
General Sequence
���ܽ��
Before describing the inspection of specific steps of cofferdam work, we will deal with the basic sequence of the work. These steps may vary from project to project, but for our purposes they will serve as a typical example. These steps are as follows:
���ڤ���ξܺ٤ʸ�����Ȥ������������ˡ����δ���Ū�ʼ��ˤĤ����������ޤ��礦�������μ��ϥץ��������ȡʷײ�ˤˤ�ä��͡����⤷��ޤ����ʤ�����̤Ȥ��ơ�ŵ��Ū����Ȥ����������ޤ������ϰʲ��Τ褦�ˤʤ�ޤ���
1. Temporary piles are driven to hold the template for the cofferdam.
�������ڤ�������Ȥߤ�����뤿����Ū�ʹ����Ǥ��ޤ���
2. The template is set on the temporary pile. This template can be remain in the cofferdam as bracing.
�������Ȥߤϰ��Ū�ʹ��ξ�����֤��ޤ����������Ȥߤϥ֥졼���ʶڰ㤤�ˤȤ������ڤ���˻Ĥ����Ȥ����ޤ���
3. Sheet piles are set in place and driven. The sheet piles will be placed around the template or bracing that will hold them in position.
�������Ĥ����ξ������ߤ��ޤ������ĤϤ����ٻ�����֥졼�������Ȥߤμ�������֤��ޤ���
4. The foundation pit is excavated inside the cofferdam. If needed, excavation will go beyond plan grade if unsuitable material is encountered. Suitable materials will be used as backfill.
�������÷�����ڤ���������˷��路�ޤ����ʷ�������ǡ���Ŭ�����ڤ����Ĥ��ä���硢�ײ�ʾ�˷��路�ޤ���Ŭ�����ڤ�����ᤷ�˻Ȥ��ޤ���
5. Foundation piles are driven, using the top ring of bracing as a template for spacing and positioning. After pile driving, more excavation may be needed. If a foundation pile tip��s elevation is higher than the cofferdam sheet pile tips, notify the geotechnical engineer.
�����֥졼���Υȥåץ��ֳ֤���֤�����Τ����Ѥ��ʤ��鹺���Ǥ��ޤ��������߸�ˤϤ���ʤ뷡�郎ɬ�פˤʤ뤫�⤷��ޤ��⤷����ù���ü�ι⤵����������ü�ι⤵����⤱��С��ϼ����ص��Τ����Τ��ޤ��礦��
6. The concrete seal is placed on the bottom of the foundation pit. The concrete is placed underwater to form a seal, which keeps the water from seeping through the foundation.
�������÷����˥���ȥ�����ޤ����夬���äˤ��߽Ф�Τ��ɤ��������������륳��Ȥ��������ߤ��ޤ���
7. The cofferdam is dewatered (pumped dry) so that work can begin on the substructure.
�������äι������Ϥ����褦�ˡ����ڤ��餫����ȴ���ޤ���
8. When the substructure is completed, the cofferdam is flooded and sheet piling is extracted.
�������ä��������������Ĥ��곰�����ڤ���˿������ޤ���
They are illustrated in the following drawings.
�ʲ��οޤͤˤ��Ʋ�������
Placing Steel Sheet Piles
�����Ĥ�����
Materials
����
Most cofferdams are constructed of steel sheet piles. Steel offers the most strength and durability—and it can be removed and used again. The type of steel sheet piles used is up to the contractor, but you should be familiar with the characteristics of the piling. Most sheet piles are the deep-arch types that interlock as shown below:
�ۤȤ�ɤ����ڤ���ˤϹ����Ĥ��Ȥ��Ƥ��ޤ������ݤϤ�äȤ���ѵ����ˤ����졢������������Ѥ��ǽ�Ǥ����ɤμ�����Ĥ�Ȥ������ڷ��ȼԤˤ��ޤ��������ʤ��⤽�ι��Ǥ�����ħ�ˤĤ��Ƥ褯�ΤäƤ����٤��Ǥ��礦���ۤȤ�ɤ����Ĥϲ��οޤΤ褦��Ϣ�뤹��ʿ����˥����������פǤ���
You will have to make a few checks on the piles both before and during installation:
������Ȥ������ˤ����Ĥ��γ�ǧ��ɬ�פǤ���
· Check the sizes of the steel sheet piles. They must be long enough and have the dimensions shown on the working drawings.
- �������Ĥ��礭�����ǧ���ޤ��礦���ܹ��ޤ������줿��ˡ�Ȥ���ǡ���ʬ��Ĺ�����ʤ��ƤϤ����ޤ���
· Check for crimped flanges or damaged interlocks. On regular steel H-piles, minor damage will not affect the driving or strength of the piles, but on steel sheet piles, even small crimps or bends can make driving and interlocking difficult and dangerous.
- ���ʤä��ե��»������Ϣ�������ʤ�����ǧ���ޤ��礦������Ū��H�ݹ��ξ�硢������»���Ϲ��ζ��٤����ߤ˱ƶ����ޤ��������Ĥξ��ϡ��������ޤ��ʤä���ʬ��������������ߤ�Ϣ�뤬����ˤʤä��ꡢ�����ˤʤä��ꤷ�ޤ���
· Check the handling holes and other openings in the sheets. All holes that will be below the water level must be plugged or welded so that the cofferdam will remain dry after it is dewatered.
- �������ʱ��¡���˽���Ƥ��ޤä���䤽��¾�γ��������ʤ�����ǧ���ޤ��礦�����ڤ��餬��ȴ�����줿�塢�����˿夬����ʤ��褦�ˡ���ˤĤ�����ʬ�ˤ��ʤ����ä������ܤ��뤫�ɤ��ʤ��ƤϤ����ޤ���
It is a good idea to check the steel sheet piles before installation, since damage can occur during storage and handling.
�ݴ���䱿�����»����ȯ�����뤳�Ȥ⤢��Τǡ��������˹����Ĥ����뤳�Ȥ����ᤷ�ޤ���
Setting and Driving
���֤�����
The most important step in setting and driving sheet piles is the construction of a well-built guide structure. In many cases, the guide structure may be a top level of bracing that is constructed between struts—extended foundation piles.
���Ĥ����֤����ߤǤ�äȤ���פʼ��ϡ��ɤ��Ǥ���Ƴ�ʥ����ɡ˹�¤�λܹ��Ǥ���¿���ξ�硢����ʱ�Ĺ���ù��ˤδ֤����֤��줿�֥졼��������Ƴ��¤�ˤʤ�ޤ���
First, a few struts are driven around the perimeter of the planned cofferdam. These piles will extend above the water level. After this, a bracing framework is set up between these struts. This guide structure should be checked for proper location.
�ޤ������ܤλ����ײ褵�줿���ڤ���μ��Ϥ��Ǥ��ޤ��������ι��Ͽ��̾�ޤDZ�Ĺ����ޤ������θ塢����δ֤˥֥졼�����Ȥߤ�ܹ����ޤ�������Ƴ��¤��Ŭ�ڤʾ�ꤢ�뤫��ǧ����٤��Ǥ���
There may be a need for more than one guide structure. When the top bracing is placed after the sheet piles are driven, a temporary inside guide frame may be used. Alternatively, if the sheet piles extend much higher than the water level, a guide frame may be place on top of the bracing.
��İʾ��Ƴ��¤��ɬ�פˤʤ���⤢��ޤ����������߸�ξ����֥졼�����ֻ��ˡ������ΰ��Ū�ʥ����ɥե졼���Ƴ���ȡˤ����Ѥ������⤢��ޤ����ޤ��ϡ����Ĥ���̤��⤺�äȹ⤤��硢�����ɥե졼���֥졼���ξ��������֤��뤳�Ȥ⤢��ޤ���
As mentioned earlier, the actual construction of the cofferdam—including setting and driving the sheet piles—is the responsibility of the contractor. Still, you should be familiar with the work. Some of the important steps are listed below:
���˽Ҥ٤��褦�ˡ����Ĥ����֤����ߤ�ޤ����ڤ���λܹ��ϡ��ڷ��ȼԤ���Ǥ�Ǥ��������ʤ��⤽�λŻ��ˤĤ����ɤ��ΤäƤ����٤��Ǥ��礦�������Ĥ��ν��פʼ��ϰʲ����ͤˤʤ�ޤ���
· The entire cofferdam should be set in place before the bulk of the driving is done.
- �����ߺ�Ȥ�����ʬ����������ˡ����ڤ������Τ����֤���Ƥ���٤��Ǥ���
· Setting should begin at one corner and continue around the cofferdam. Some of the sheet piles may need to be driven more, so that the structure will hold in place. Be sure the corners are vertical and placed in the right locations. This will ensure the proper positioning of the remaining sheet piling.
- �����֤Ϥ���Ѥ���Ϥ�ơ����ڤ����Ϥ�Ǥ����ޤ�����¤�����־�꤫�餺��ʤ��褦�ˡ������Ĥ������ĤϤ���˿����Ǥ�ɬ�פ����뤫�⤷��ޤ��ƳѤ���ľ�����������֤ˤ��뤫��ǧ���ޤ��礦�����κ�Ȥϡ��Ĥ�����Ĥ����������֤ˤ��뤳�Ȥ��ݾڤ��Ƥ���ޤ���
· All of the sheet piles must be set vertically. The corners are more rigid and the walls will adjust to fit them. This is why it is especially important to keep the corners vertical. If any piles begin to lean, they should be reset.
- �����ĤϤ��٤ƿ�ľ�����֤���ʤ��ƤϤ����ޤ����ѤϤ���ˤ��ä���ȸ��ꤵ��Ƥ��ơ��ɤϳѤ˹礦�褦��Ĵ�����ޤ������Τ���Ѥ��ľ���ݤĤ��Ȥ����פʤΤǤ����⤷��������Ϥ�顢���ι����Ǥ�ľ���٤��Ǥ���
· The actual driving of the sheet piles should be done a few feet at a time, working around the cofferdam and driving the sheet piles at approximately the same time.
- �����ڤ�����դι������������ߤ�ۤ�Ʊ���˿ʤ�ʤ��顢�ºݤ��������ߤϰ��٤˿��ե����Ȥ��ĹԤ��٤��Ǥ���
Cofferdam construction procedures will vary from one contractor to another.
���ڤ���λܹ������ڷ��ȼԤˤ�ä��͡��Ǥ���
Length and Penetration
The proper length and penetration of the steel sheet piles in the cofferdam will be shown on the working drawings. You will not need to compute bearing or check blow counts, but you should inspect the final driven sheet piles for some general conditions:
· If the cofferdam is to be dewatered, the sheet piles must be driven to sufficient depth to insure a dry seal. Additionally, it must have adequate bracing to keep it from collapsing under water pressure.
· No matter how deep a sheet pile is to be driven, it must have enough bearing capacity to support the weight of the pile, the top brace or other guide frames, and other construction equipment.
· Cofferdams must not tilt or move laterally during driving. If they do, they must be righted or enlarged to provide the necessary clearance.
· Welding at interlocks should be avoided where possible. If welding is done, however, no welding material should be placed inside the interlock. Otherwise, free movement will be blocked.
Excavating the Cofferdam
After the steel sheet piling for the cofferdam has been set and driven, the foundation pit must be excavated to allow the placement of the footing at the proper depth. As an inspector, you have two tasks here:
· You must check the final depth of the excavation.
· You must inspect the excavated material.
Checking Final Depth
The contractor must excavate inside the cofferdam to a level bottom. To insure this is done, you must take soundings along the bottom when excavation is complete.
Soundings
Soundings are measurements to the cofferdam floor taken from above the water level. The cofferdam will not be dewatered as of yet, so you will have to measure through the water. To do this, do the following:
1. Select or prepare a suitable sounding device. This can be as simple as a heavy weight attached to a cloth tape, or a long piece of marked pipe or an extendable metal tube. This size and type of the material will depend upon the water depth and available device.
2. Establish a known elevation reference point and mark it. This point can be located most easily on the top bracing or guide frame. The surface of the water inside the cofferdam can be used as a reference if the soundings are taken at once.
3. Drop the sounding device into the cofferdam and lower it to the bottom. Be sure that the bottom is reached. If cloth tape is being used, lower it slightly more, then pull up until you feel it just pick up the weight.
4. Note the measurement on the tape or pipe and subtract it from the elevation reference point, to get the bottom elevation.
These are illustrated in the diagram below.
Field Books
You will need to take many soundings over the floor of the cofferdam so an accurate check can be made. By setting up a grid system in a field book, you can make a systematic check over the entire bottom. A sample grid is shown below.
The top number is the original sounding (the measurement from the reference point down to the bottom of the cofferdam.) The second reading is the sounding down to the top of the concrete seal. We will discuss the second soundings below.
Inspecting Excavated Material
As the foundation pit is excavated, you should inspect the material being removed. If suitable is reached, then the contractor need only excavated to the required depth.
If the material at the planned depth is unsuitable, such as muck or other organic material, then other actions must be taken. You should inform your project engineer so that he or she can tell you the proper procedures to be followed. Usually, the unsuitable material must be undercut to a specified depth and then select backfill material must be placed on the floor of the cofferdam. This select backfill will provide a suitable bed for the seal.
There are a few other things you will have to inspect during excavation:
1. You must be sure that no excavation is done outside the cofferdam unless ordered by the project engineer.
2. If excavation is done before the cofferdam is sunk, the contractor must backfill these materials to the original ground line after the foundation is in place.
3. Materials excavated from the foundation excavation must be disposed of properly—away from the water area—and not be allowed to filter back into the water. The disposal of any materials must comply with all applicable regulations and laws.
Driving Cofferdam Foundation Piles
After the foundation pit inside the cofferdam is excavated and backfilled, foundation piles must be driven, if needed. Your basic duties as an inspector will be no different than those for regular foundation piles—you will have to check the piles when they are delivered, inspect the pile driving operations, determine and record when bearing is reached and check the final pile elevations. However, you will have some additional duties, since driving piles underwater creates some special problems. In this section we will discuss:
· Using a template for pile driving; and
· Using ��followers�� to drive piles.
Setting Bracing and Template
The first step in preparing for pile driving is to set the bracing for the cofferdam sheet piling. The contractor��s working drawings will give the details of the bracing plan he or she is going to use. The contractor is responsible for the bracing system, although the engineer may request approval of his or her design. You should be aware of some of the factors that affect design:
· Location of piles;
· Elevation of construction joints in the planned pier;
· Elevation of the construction seal;
· High-tide level; and
· Plan dimensions of the footing and pier.
The most important point is that the bracing should not interfere with the remaining construction work or pile driving. In particular, the bracing should be designed to facilitate pier construction and form removal.
Usually, the top ring of the bracing will serve as a template for pile driving. The template acts as a reference from which pile locations can be easily determined. By establishing a reference point for elevation and alignment, you can easily check the pile driving work.
A plan view of the bracing and template is shown below. Note that the template frames the footing and planned pile locations.
Driving Foundation Piles
Alignment
As an inspector, you must check the alignment and spacing of the foundation piles as they are driven. As we saw earlier, the template will aid you in this check. An established reference point should be marked on the template. From this, you will need to:
1. Measure along the template to locate where the piles should be driven; and
2. Check the spacing between the piles as they are being driven.
As the piles are being driven, you can also check vertical alignment by using the top of the template as a reference line.
Followers
A follower is a steel pile extension used to drive the pile below the reach of the hammer. A follower is placed between the foundation pile and the hammer, so that the pile can be driven inside the cofferdam, underwater, to the proper elevation. The contractor will design his or her own follower, but there are some general guidelines you should know:
· The follower must be rugged enough to withstand repeated blows. To insure this, reinforcement of some kind may be needed at both ends of the follower.
· The follower must be able to transmit full force of the hammer without deflecting. If you see the follower deflect during pile driving, be sure the contractor stop driving and replaces the follower.
· The guides for the follower and pile must be designed so that the proper alignment will be maintained.
The diagram below shows the use of the follower.
Driving
When driving piles with a follower, the first pile shall be longer and driven without the follower. This evaluates the performance of the follower and aides in establishing the driving criteria. These driving criteria are then established by the geotechnical engineer.
Elevation
Your final step in pile driving is to check the pile elevation. The proper elevation will be shown on the plans. In order to make this check, first you will need to mark the follower, in feet. Then you can read the penetration depth at the reference point on the template.
For instance, if the elevation of the reference point on the template is 100.00 feet and the follower is driven to the 50-foot mark on the follower, then the tip (or toe) of the foundation pile is at an elevation of 50.00 feet.
You will have one other job after all the piles are driven: take surroundings on the foundation. The grade may have risen due to the piles displacing the soil. If the foundation is above the planned grade, then the contractor will have to excavate back to proper grade.
If a foundation pile tip��s elevation is higher than the tips of the cofferdam��s sheet piling, notify the geotechnical engineer.
Placing the Concrete Seal and Dewatering
The cofferdam is nearly complete, but before work can begin inside the cofferdam, the water has to be removed. If dewatering is done without sealing the bottom, the water will rise through the bottom and fill the cofferdam. For this reason, a concrete seal is placed on the cofferdam floor prior to dewatering.
In this section we will discuss concrete seals and dewatering, and the things you will have to inspect. You will have some important inspection duties, so be sure to study this section carefully. Without a proper seal, the cofferdam will be useless and dangerous.
Placing the Concrete Seal
Concrete foundation seals are used when cofferdams cannot be pumped dry. The concrete seals are poured after the piles have been driven. After the seals have been set underwater, the cofferdams are dewatered and the footings are constructed on top of the dry seals.
Since underwater placement is necessary for the construction of foundation seals in cofferdams, you as inspector will have the following responsibilities:
· Review the contractor��s plan of operation.
· Inspect and measure the foundation excavation just before concrete placement.
· Be sure that reference elevations are set on the cofferdam. Reference elevations are necessary to determine the elevation of the concrete that has been placed.
· Be sure that the concrete does not flow through the water. To insure this, the contractor may follow certain steps when placing the tremie underwater:
o Place the empty tremie in the water.
o Place a bundle of burlap or similar material in the tremie.
o Place the concrete in the tremie, so that the burlap will be forced through the tremie, keeping the water from mixing with the concrete.
· Be sure that the hopper is full when moving the tremie pipe. If the tremie pipe is empty—��loses its prime��—then water will enter the tremie pipe. Only when the hopper is full can it be assumed that the tremie pipe is full.
· Be sure that the lower end of the tremie pipe is buried in fresh concrete at all times. If the prime is lost, replace the burlap procedure.
· The tremie pipe shouldn��t be moved by more than 5 or 6 feet at a time. The tremie pipe and hopper must be full as they are moved across the seal.
· Check the location of the top of the seal frequently by taking sounding with a flat, 6-inch diameter sounding device.
· Be sure that the top of the concrete is kept horizontal.
· Be sure that no one vibrates, spaces or tamps the concrete or attempts to level the surface with any tool.
· Be sure that dewatering is not started until the concrete has set sufficiently—and in no case less than 72 hours. After the cofferdam is dewatered, the loose soft laitance and other foreign materials should be removed. If the seal is too high in places, then the contractor must chip the concrete to obtain a horizontal surface.
· If the water level outside the cofferdam is apt to rise due to storms, be sure that the cofferdam is vented so that the water level inside the cofferdam is the same as that outside. When dewatering is begun, these vents must be plugged.
A common construction practice is to slope the concrete seal so that a low area is created at one corner of the cofferdam. The low area will allow the water to be pumped out thoroughly.
These concepts are illustrated in the diagram below.
Pumping
Pumping to dewater a sealed cofferdam must not commence until the seal has set sufficiently to withstand the hydrostatic pressure, and in no case earlier than 72 hours after placement of the concrete.
Those are the specified requirements, but how is pumping accomplished? Usually, large temporary pumps are used to pump out a cofferdam initially, and smaller automatic pumps are then used to keep it dry. It is important to have a large pump capacity in initial dewatering, since leakage through the sheet piles will be excessive until the sheet-pile interlocks tighten up under pressure. Several large pumps are normally required to give a satisfactory rate of dewatering.
After the cofferdam has been dewatered, a few small pumps can be used to keep it dry. These pumps are economical in their operation and, being float operated, will automatically control the water level. It's a good idea for the Contractor to have standby pumps in case the main pump fails.
It may be desirable to construct a tide gate in a cofferdam. This is usually done during the driving of the steel sheet piles by burning off one pile at the low-water line. The top section of this pile can then be raised a few feet to open the gate. By leaving this gate open during construction of the cofferdam, unbalanced pressures are avoided. Without the tide gate, the water will still fill up inside the cofferdam to the high-tide level but, as the tide starts to fall, the drop in the inside water level will occur at a slower rate. The unbalanced levels produce an outwardly directed pressure for which few cofferdams are designed.
When the cofferdam is ready for dewatering, the tide gate is left open until low tide. As the tide starts to rise, the gate is closed and welded shut. All available pumping capacity is then thrown into action. This has been found to be the best and sometimes the only way in which a start can be made on dewatering.
Sealing Leaking Joints
Most well built cofferdams will not leak excessively after this start in dewatering has been accomplished.
The more rigid and heavily braced cofferdams generally leak more than flexible cofferdams, because in the latter case the interlocks are very tight under stress. This can be taken care of with a slightly larger pump capacity.
If excessive leakage through the interlocks is encountered, there are several techniques for reducing the flow. Often some filler material is dropped through the water just outside the sheet piles so that the inflowing water will suck it into the interlocks. Some of the mixtures which have been used are sand and sawdust; cement and sand; and cinders. On cofferdams that leak excessively, weighted canvas sheets can be draped on the outside of the sheet piles. A diver can place sandbags at the bottom to hold the canvas against the sheet piles.
Serious leaks can occur where sheet piles have been driven out of interlock, and corrective measures are time consuming and expensive. Usually the fact that a sheet pile has been driven out of the interlocks is not known until efforts to pump down have been unsuccessful. A diver can then be sent down to inspect the interlocks but, since any opening is usually at or near the inside bottom, it may be hard to find. Under some conditions, a coloured dye in the outside water might help locate the bad spot. In some cases cofferdams have been successfully dewatered, then they blow at the location of a gap.
Once a leaking spot has been definitely located, corrective measures can be started. One method is to drive a "blister" of two or three sheet piles on the outside. A gasket of some soft material is then used to seal the new piles against the old wall, or a diver can drive wedges. Where possible, the solid inside this blister is excavated down to the level of the bottom of the concrete seal, and the blister is then filled with tremie concrete. In some special cases the gap can be satisfactorily sealed by a diver driving wedges directly and placing canvas on the outside. This method is effective only where the seal on the inside comes up above the mud line on the outside. A temporary patch may be made by a diver using underwater quick-setting hydraulic cement.
Grading The Seal
Your final inspection job will be to check the grade of the finished concrete seal. You can do this before or after dewatering. You will need to use the grades that you recorded when you took the final excavation soundings.
The soundings that you take on the concrete seal should be at the same locations as for the final excavation. Again, use the same grid, the same intersections and the same reference point on the cofferdam or template. It is important that you are sure that the same reference point is used. Otherwise, the concrete seal grades cannot be used to determine the amount of concrete in the seal.
You must document all soundings in your field book, as shown below. Later this information can be used to determine pay quantities.
If the soundings indicate high spots in the seal, the contractor will have to chip off these spots, so that the seal is as level as possible.
2008ǯ04��10��(��) 09:36:09 Modified by harukaichik
ź�եե��������(��2��)
12c96582.jpg (7.73KB)
Uploaded by harukaichik 2008ǯ04��09��(��) 21:52:42
Uploaded by harukaichik 2008ǯ04��09��(��) 21:52:42
6cd3c15e.jpg (72.26KB)
Uploaded by harukaichik 2008ǯ04��08��(��) 07:49:06
Uploaded by harukaichik 2008ǯ04��08��(��) 07:49:06