Unity3D - シェーダー2
最終更新:
 bokkuri_orz 2015年04月16日(木) 00:53:28履歴
目次 
サンプル
法線表示
Shader "Tutorial/Display Normals" {
	SubShader {
		Pass {
			CGPROGRAM	//---- Cgコード開始

			#pragma vertex vert		// vertex shaderの指定
			#pragma fragment frag	// fragment shaderの指定

			#include "UnityCG.cginc"	// ビルトインCgファイルをインクルード

			// vert から frag に渡されるデータ
			struct v2f {
				float4 pos : SV_POSITION;
				float3 color : COLOR0;
			};

			v2f vert (appdata_base v)
			{
				v2f o;
				o.pos = mul (UNITY_MATRIX_MVP, v.vertex);
				o.color = v.normal * 0.5 + 0.5;		// 法線ベクトルをカラーとして扱う
				return o;
			}

			half4 frag (v2f i) : COLOR
			{
				return half4 (i.color, 1);	// アルファ要素を追加して、最終的なカラーとする
			}

			ENDCG	//---- Cgコード終了
		}
	}
	Fallback "VertexLit"
}
公式サイトより、出力結果

Moblie-Diffuse
- no Main Color
- fully supports only 1 directional light. Other lights can affect it, but it will be per-vertex/SH.
Shader "Mobile/Diffuse"
{
	Properties
	{
		_MainTex ("Base (RGB)", 2D) = "white" {}
	}

	SubShader
	{
		Tags { "RenderType"="Opaque" }
		LOD 150

		CGPROGRAM
		#pragma surface surf Lambert noforwardadd	// ライティング

		sampler2D _MainTex;

		struct Input
		{
			float2 uv_MainTex;
		};

		void surf (Input IN, inout SurfaceOutput o)
		{
			fixed4 c = tex2D(_MainTex, IN.uv_MainTex);
			o.Albedo = c.rgb;
			o.Alpha = c.a;
		}
		ENDCG
	}

	Fallback "Mobile/VertexLit"
}
Unlit/Texture
- no lighting
- no lightmap support
- no per-material color
Shader "Unlit/Texture"
{
	Properties
	{
		_MainTex ("Base (RGB)", 2D) = "white" {}
	}

	SubShader
	{
		Tags { "RenderType"="Opaque" }
		LOD 100

		Pass
		{
			CGPROGRAM

			#pragma vertex vert
			#pragma fragment frag

			#include "UnityCG.cginc"

			struct appdata_t
			{
				float4 vertex : POSITION;
				float2 texcoord : TEXCOORD0;
			};

			struct v2f
			{
				float4 vertex : SV_POSITION;
				half2 texcoord : TEXCOORD0;
			};

			sampler2D _MainTex;
			float4 _MainTex_ST;

			v2f vert (appdata_t v)
			{
				v2f o;
				// 頂点とUVを出力
				o.vertex = mul(UNITY_MATRIX_MVP, v.vertex);
				o.texcoord = TRANSFORM_TEX(v.texcoord, _MainTex);
				return o;
			}

			fixed4 frag (v2f i) : SV_Target
			{
				fixed4 col = tex2D(_MainTex, i.texcoord);	// UVからテクスチャのカラーを取得
				return col;
			}

			ENDCG
		}
	}
}
Textured Colored
Shader "Tutorial/Textured Colored"
{
	Properties
	{
		_Color ("Main Color", Color) = (1,1,1,0.5)
		_MainTex ("Texture", 2D) = "white" { }
	}

	SubShader
	{
		Pass
		{
			CGPROGRAM

			#pragma vertex vert
			#pragma fragment frag

			#include "UnityCG.cginc"

			float4 _Color;
			sampler2D _MainTex;

			struct v2f
			{
				float4 pos : SV_POSITION;
				float2 uv : TEXCOORD0;
			};

			float4 _MainTex_ST;

			v2f vert (appdata_base v)
			{
				v2f o;
				o.pos = mul (UNITY_MATRIX_MVP, v.vertex);
				o.uv = TRANSFORM_TEX (v.texcoord, _MainTex);
				return o;
			}

			half4 frag (v2f i) : COLOR
			{
				half4 texcol = tex2D (_MainTex, i.uv);
				return texcol * _Color;		// テクスチャカラーと_Colorの掛けあわせ
			}

			ENDCG
		}
	}

	Fallback "VertexLit"
}
Depth Texture
cameraから描画する
次のスクリプトをメインカメラに設定して、テクスチャのピクセルをそのまま出力するマテリアルをインスペクタで設定します。
public class RenderDepthBuffer : MonoBehaviour
{
	private RenderTexture m_colorTex;
	private RenderTexture m_depthTex;
	public Material m_postRenderMat;

	void Start ()
	{
		Camera cam = GetComponent<Camera>();
		cam.depthTextureMode = DepthTextureMode.Depth;

		// カラーバッファ用 RenderTexture
		m_colorTex = new RenderTexture(Screen.width, Screen.height, 0, RenderTextureFormat.ARGB32);
		m_colorTex.Create();

		// デプスバッファ用 RenderTexture
		m_depthTex = new RenderTexture(Screen.width, Screen.height, 24, RenderTextureFormat.Depth);
		m_depthTex.Create();

		// cameraにカラーバッファとデプスバッファをセットする
		cam.SetTargetBuffers(m_colorTex.colorBuffer, m_depthTex.depthBuffer);
	}

	void OnPostRender()
	{
		// RenderTarget無し → 画面に出力される
		Graphics.SetRenderTarget(null);

		// デプスバッファを描画する(m_postRenderMatはテクスチャ画像をそのまま描画するマテリアル)
		Graphics.Blit(m_depthTex, m_postRenderMat);
	}
}
- カラーバッファ
- デプスバッファ
デプスバッファを別のcameraで利用する
public class RenderAfter : MonoBehaviour
{
	// 1つ目のcameraで描画されたカラーバッファとデプスバッファ
	public RenderTexture m_firstColorTex;
	public RenderTexture m_firstDepthTex;

	// 2つ目のcameraの描画先
	private RenderTexture m_renderBuffer;

	public Material m_postRenderMat;
	public Material m_cutOffMat;

	void Start()
	{
		Camera cam = GetComponent<Camera>();

		// 二つ目のcameraの描画バッファ
		m_renderBuffer = new RenderTexture(Screen.width, Screen.height, 0, RenderTextureFormat.ARGB32);
		m_renderBuffer.Create();

		// カラーバッファは上で作成したもの
		// デプスバッファは別のcameraで描画されたもの
		cam.SetTargetBuffers(m_renderBuffer.colorBuffer, m_firstDepthTex);
	}

	void OnPostRender()
	{
		// 描画先を完全にクリアする
		Graphics.SetRenderTarget(null);
		GL.Clear(true, true, new Color(0, 0, 0, 0));

		// 1つ目のcameraで描画されたカラーバッファを描画
		Graphics.Blit(m_firstColorTex, m_postRenderMat, 0);

		// 2つ目のcameraで描画されたカラーバッファを描画(黄色の板部分)
		// そのまま描画すると全て塗りつぶされてしまうので、適当にカットオフマテリアルで描画
		Graphics.Blit(m_renderBuffer, m_cutOffMat, 0);
	}
}
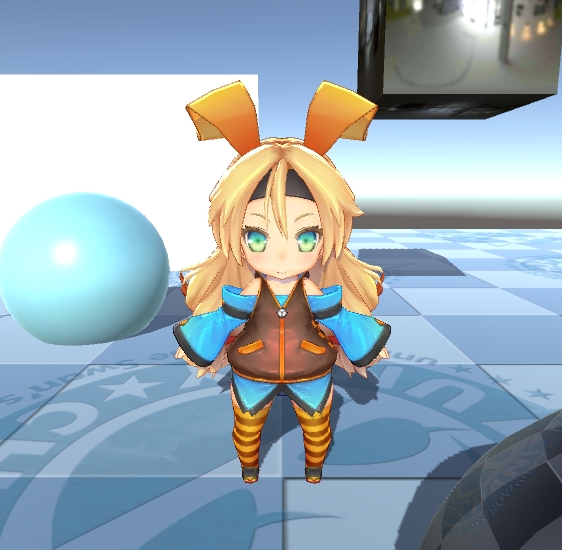
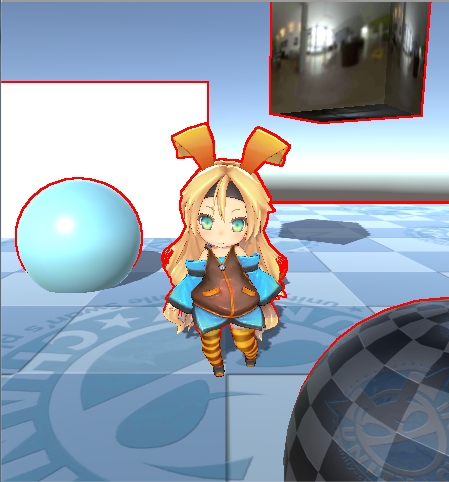
- オブジェクトの配置
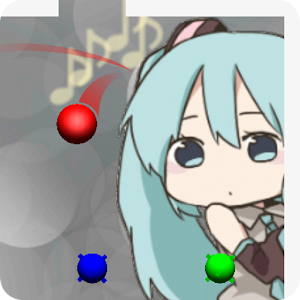
ユニティちゃん、球に「黄色の板」が重なるように配置。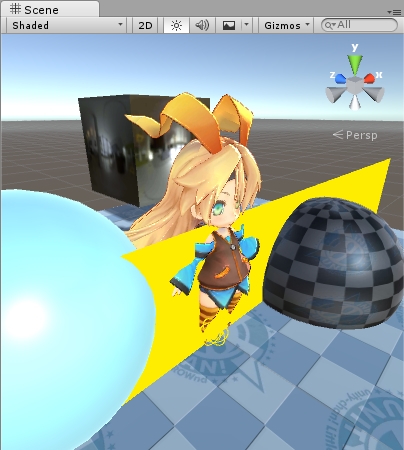
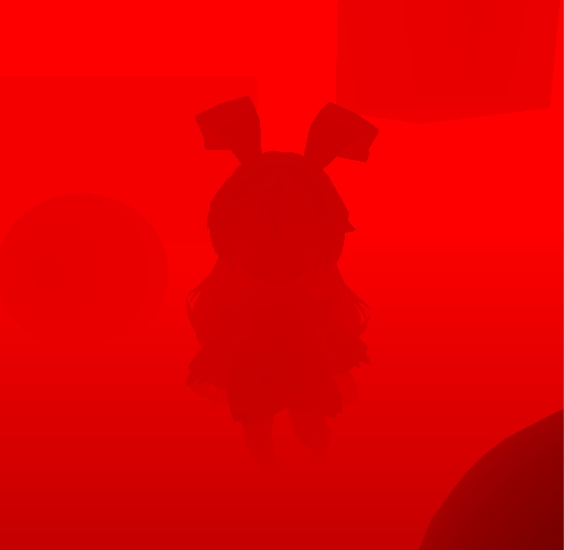
- 1つ目のcameraで見たところ
「黄色の板」以外を描画。
画像右下のサムネイルを参考に。
- 2つ目のcameraで見たところ
「黄色の板」のみを描画。
画像右下のサムネイルを参考に。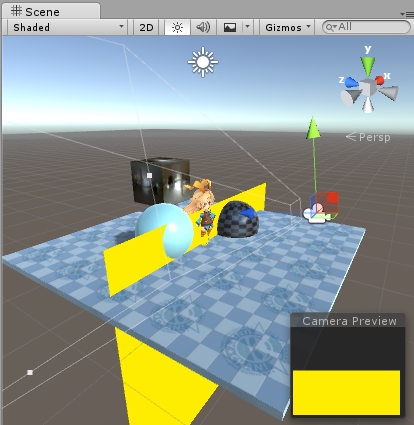
- 1つ目のcameraのデプスバッファを元に、2つ目のcameraで描画されたカラーバッファ
1つ目のデプス情報によってZテストが行われています。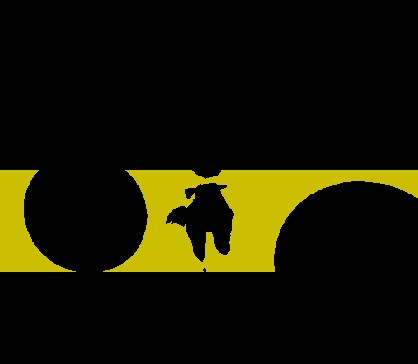
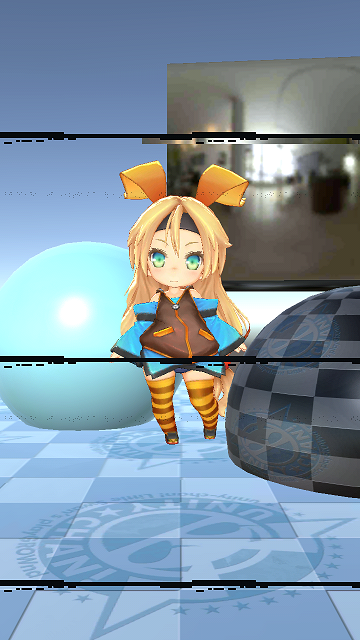
- 2つ目のcameraの OnPostRender() で二つの画像を合成して描画

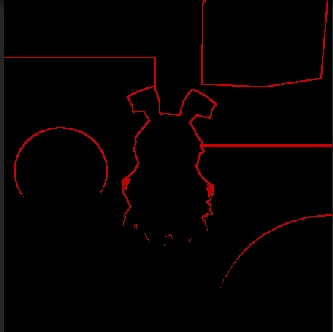
デプスバッファから輪郭抽出
●手順
- cameraにカラーバッファとデプスバッファのRenderTextureを設定
- OnPostRender() でカラーバッファを画面に描画。
- デプスバッファから輪郭を抽出して別のRenderTextureへ描画
- 輪郭テクスチャを画面に合成
- 作成した輪郭テクスチャ
サンプルコード
- カメラにアタッチするスクリプト。
public class RenderDepthEdge : MonoBehaviour
{
	private RenderTexture m_colorTex;	// カラーバッファ
	private RenderTexture m_depthTex;	// デプスバッファ
	private RenderTexture m_edgeTex;	// 輪郭描画先のバッファ

	public Material m_postRenderMat;	// カラーバッファ描画用
	public Material m_renderEdgeMat;	// 輪郭抽出シェーダー
	public Material m_cutOffMat;		// 輪郭合成用

	void Start ()
	{
		Camera cam = GetComponent<Camera>();
		cam.depthTextureMode = DepthTextureMode.Depth;

		// カラーバッファ用 RenderTexture
		m_colorTex = new RenderTexture(Screen.width, Screen.height, 0, RenderTextureFormat.ARGB32);
		m_colorTex.Create();

		// デプスバッファ用 RenderTexture
		m_depthTex = new RenderTexture(Screen.width, Screen.height, 24, RenderTextureFormat.Depth);
		m_depthTex.Create();

		// 輪郭描画先
		m_edgeTex = new RenderTexture(Screen.width, Screen.height, 0, RenderTextureFormat.ARGB32);
		m_edgeTex.Create();

		// cameraにカラーバッファとデプスバッファをセットする
		cam.SetTargetBuffers(m_colorTex.colorBuffer, m_depthTex.depthBuffer);
	}

	void OnPostRender()
	{
		// カラーバッファを転送(m_postRenderMatはテクスチャ画像をそのまま描画するマテリアル)
		// RenderTarget無し:画面に出力
		Graphics.SetRenderTarget(null);
		GL.Clear(true, true, new Color(0, 0, 0, 0));
		Graphics.Blit(m_colorTex, m_postRenderMat);

		// 輪郭抽出用RenderTargetへ描画
		Graphics.SetRenderTarget(m_edgeTex);
		GL.Clear(true, true, new Color(0, 0, 0, 0));
		Graphics.Blit(m_depthTex, m_edgeTex, m_renderEdgeMat);

		// 輪郭テクスチャを画面に合成
		Graphics.SetRenderTarget(null);
		Graphics.Blit(m_edgeTex, m_cutOffMat);
	}
}
- 輪郭抽出シェーダー
Shader "Custom/RenderDepthEdge" {
	Properties {
		_MainTex ("Depth Texture", 2D) = "white" {}
		_Threshold ("Edge Threshold", Range(0.0001, 1)) = 0.01
		_EdgeColor ("Edge Color", Color) = (1,1,1,1)
		_Thick("Thick", Range(0.1, 5)) = 1
	}

	SubShader {
		Tags { "RenderType"="Opaque" }
		ZTest Off
		ZWrite Off
		Lighting Off
		AlphaTest Off

		Pass {
			CGPROGRAM
			#pragma vertex vert
			#pragma fragment frag
			#include "UnityCG.cginc"

			sampler2D _MainTex;
			float4	_MainTex_ST;
			float _Threshold;
			float4 _EdgeColor;
			float _Thick;
			float4	_MainTex_TexelSize;		// 1テクセルを正規化した値

			struct appdata_t {
				float4 vertex : POSITION;
				float2 texcoord : TEXCOORD0;
			};
			struct v2f {
				float4 vertex : SV_POSITION;
				half2 texcoord : TEXCOORD0;
			};

			v2f vert(appdata_t v)
			{
				v2f o;
				o.vertex = mul(UNITY_MATRIX_MVP, v.vertex);
				o.texcoord = TRANSFORM_TEX(v.texcoord, _MainTex);
				return o;
			}

			fixed4 frag(v2f input) : Color
			{
				float tx = _MainTex_TexelSize.x * _Thick;
				float ty = _MainTex_TexelSize.y * _Thick;

				// 輪郭判定値の計算
				// (-1,-1) ┼─┼ (0, -1)
				//         │  │
				// (-1, 0) ┼─┼ (0,  0)
				// の4ピクセルの対角線同士でデプス値の差を取って2乗したものを加算する
				float col00 = Linear01Depth(tex2D(_MainTex, input.texcoord + half2(-tx, -ty)).r);
				float col10 = Linear01Depth(tex2D(_MainTex, input.texcoord + half2(  0, -ty)).r);
				float col01 = Linear01Depth(tex2D(_MainTex, input.texcoord + half2(-tx,   0)).r);
				float col11 = Linear01Depth(tex2D(_MainTex, input.texcoord + half2(  0,   0)).r);
				float val = (col00 - col11) * (col00 - col11) + (col10 - col01) * (col10 - col01);

				// 閾値以下ならクリップする
				if(val < _Threshold)
				{
					clip(-1);
				}

				fixed4 col = _EdgeColor;
				return col;
			}
			ENDCG
		}
	}
}
参考
DirectX9 シェーダープログラミングブック の輪郭抽出を参考にしてます。
トラブル対策
ポストエフェクトをAndroid実機で動作させた時の画面乱れ
cameraからのカラーバッファを加工し、OnPostRender()で
Graphics.SetRenderTarget(null);
Graphics.Blit(colorBuffer, material);
として描画する際、画面が乱れることが有ります。
UnityEditor上では問題無いが、実機で動作させたときにこのような問題が発生する原因は、
描画先のバッファが完全にクリアされていないことが考えられます。
次のように明示的にクリアすると解決します。
Graphics.SetRenderTarget(null);
GL.Clear(true, true, new Color(0, 0, 0, 0));	// 描画先のカラーバッファ、デプスバッファを完全にクリアする
Graphics.Blit(m_colorTex, m_renderTexMat);

タグ


最新コメント