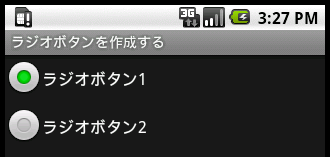
ラジオボタンを作成する
最終更新:
 moonlight_aska 2010年07月25日(日) 00:29:01履歴
ラジオボタンを作成する方法は2通りある.
静的に決定しているものはXMLで定義して, 動的に決定するものはコードで定義するというのが一般的である.
XMLファイルにより定義
コードにより定義
静的に決定しているものはXMLで定義して, 動的に決定するものはコードで定義するというのが一般的である.
XMLファイルにより定義 
- res/values/strings.xml
- ラジオボタンに表示する文字列を定義する.
<?xml version="1.0" encoding="utf-8"?>
<resources>
<string name="app_name">ラジオボタンを作成する</string>
<string name="radiobutton_label01">ラジオボタン1</string>
<string name="radiobutton_label02">ラジオボタン2</string>
</resources>
- res/layout/main.xml
- "@+id/radiobutton_idXX"でプログラムからアクセスするIDを定義する.
- ラジオグループをどれくらいの大きさで配置するかを指定する.
- "@string/radiobutton_labelXX"で表示する文字列を指定する.
- ラジオボタンはチェックなし状態で作成されるので, 通常はどれかをチェックする.
- ラジオボタンのグループ化を指定する.
<?xml version="1.0" encoding="utf-8"?>
<LinearLayout xmlns:android="http://schemas.android.com/apk/res/android"
android:orientation="vertical"
android:layout_width="fill_parent"
android:layout_height="fill_parent"
>
<RadioGroup android:id="@+id/radiogroup_id" ---- ラジオボタンをグループ化
android:layout_width="wrap_content"
android:layout_height="wrap_content">
<RadioButton android:id="@+id/radiobutton_id01"
android:layout_width="wrap_content"
android:layout_height="wrap_content"
android:text="@string/radiobutton_label01"
android:checked="true" ---- ラジオボタンをチェック状態に
/>
<RadioButton android:id="@+id/radiobutton_id02"
android:layout_width="wrap_content"
android:layout_height="wrap_content"
android:text="@string/radiobutton_label02"
/>
</RadioGroup>
</LinearLayout>
コードにより定義
Activity#onCreateメソッドをオーバーライドして, ラジオボタンを定義するコードを記述する.
- LinearLayoutクラス, RadioButtonクラス, RadioGroupクラスをインポートする.
- ラジオボタンを生成し, 表示する文字列をセットする.
- ラジオボタンはチェックなし状態で作成されるので, 通常はどれかをチェックする.
- ラジオグループを生成し, ラジオボタンをグループに追加する.
- ラジオグループを配置するレイアウトを生成し, ラジオグループをレイアウトに追加する. このとき, ラジオグループをどれくらいの大きさで配置するかを指定する.
- setContentViewメソッドに, UIツリーのルートノードを表すウィジェットとしてレイアウトを渡して, アクティビティに関連付ける.
package com.moonlight_aska.android.radiobutton01;
import android.app.Activity;
import android.os.Bundle;
import android.widget.LinearLayout;
import android.widget.RadioButton;
import android.widget.RadioGroup;
public class RadioButton01 extends Activity {
/** Called when the activity is first created. */
@Override
public void onCreate(Bundle savedInstanceState) {
super.onCreate(savedInstanceState);
// ラジオボタンを生成
RadioButton radio01 = new RadioButton(this);
radio01.setText(R.string.radiobutton_label01);
radio01.setChecked(true); // ラジオボタンをチェック状態に
RadioButton radio02 = new RadioButton(this);
radio02.setText(R.string.radiobutton_label02);
// ラジオボタンをグループ化
RadioGroup group = new RadioGroup(this);
group.addView(radio01);
group.addView(radio02);
// レイアウトにラジオグループを追加
LinearLayout layout = new LinearLayout(this);
layout.addView(group, new LinearLayout.LayoutParams(
LinearLayout.LayoutParams.WRAP_CONTENT,
LinearLayout.LayoutParams.WRAP_CONTENT));
setContentView(layout);
}
}

コメントをかく