I2Cで通信する
最終更新:
 moonlight_aska 2017年10月29日(日) 16:22:52履歴
Android Things 
I2CでスレーブデバイスとI2C通信するには, I2cDeviceクラスを利用する.
レジスタ値のリード
- I2cActivity.java
- PeripheralManagerServiceクラスのインスタンスを生成する.
- PeripheralManagerService#openI2cDeviceメソッドで, デバイスアドレスを指定してI2cDeviceクラスのオブジェクトを取得する.
- I2cDevice#writeメソッドで, コマンドを送信する.
- I2cDevice#readメソッドで, レスポンスを受信する.
- I2cDevice#closeメソッドで, デバイスを解放する.
package com.moonlight_aska.androidthings.i2c;
import android.app.Activity;
import android.os.Bundle;
import android.util.Log;
import com.google.android.things.pio.I2cDevice;
import com.google.android.things.pio.PeripheralManagerService;
import java.io.IOException;
public class I2cActivity extends Activity {
private static final String TAG = "I2cActivity";
private static final String I2C_NAME = "I2C1";
private static final int I2C_ADDRESS = 0x10;
private I2cDevice mI2c;
@Override
protected void onCreate(Bundle savedInstanceState) {
super.onCreate(savedInstanceState);
PeripheralManagerService manager = new PeripheralManagerService();
try {
// I2Cデバイスオープン
mI2c = manager.openI2cDevice(I2C_NAME, I2C_ADDRESS);
byte[] cmd = new byte[2];
byte[] res = new byte[20];
for (int i=0; i<3; i++) {
cmd[0] = (byte)(i+1);
// コマンド送信
mI2c.write(cmd, 1);
try {
Thread.sleep(1000);
} catch (InterruptedException e) {
e.printStackTrace();
}
// レスポンス受信
mI2c.read(res, res.length);
Log.d(TAG, convResToString(res));
}
} catch (IOException e) {
Log.e(TAG, "Error on PeripheralIO API", e);
}
}
private String convResToString(byte[] res) {
// 終端を探索
int length = 0;
for (int i=0; i<res.length; i++) {
if (res[i] == -1) { // 終端の検出(文字以降は値-1)
length = i;
break;
}
}
// byte -> String変換
char[] mes = new char[length];
for (int i=0; i<length; i++) {
mes[i] = (char)res[i];
}
return new String(mes);
}
@Override
protected void onDestroy() {
super.onDestroy();
if (mI2c != null) {
try {
// I2Cデバイスクローズ
mI2c.close();
} catch (IOException e) {
Log.e(TAG, "Error on PeripheralIO API", e);
} finally {
mI2c = null;
}
}
}
}
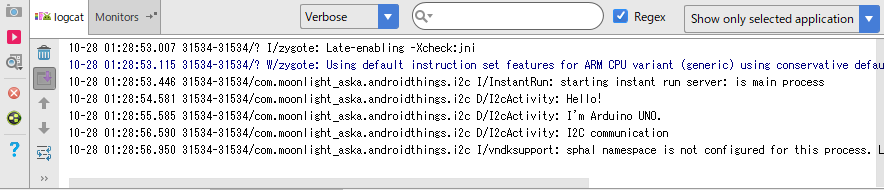
- 動作例
相手:Arudino UNO
[参考]
- Arudino UNO側コード
#include <Wire.h>
#define I2C_ADDRESS 0x10
void setup() {
// put your setup code here, to run once:
Serial.begin(9600);
Wire.begin(I2C_ADDRESS);
Wire.onRequest(requestEvent);
Wire.onReceive(receiveEvent);
Serial.println("i2c slave start");
}
void loop() {
// put your main code here, to run repeatedly:
}
byte cmd;
void receiveEvent(int n) {
Serial.println("Receive data");
for (int i=0; i<n; i++) {
if (Wire.available()) {
cmd = Wire.read();
Serial.print(cmd, HEX);
Serial.print(" ");
}
}
}
void requestEvent() {
Serial.println("Send data");
if (cmd == 1) {
Wire.write("Hello!");
}
else if (cmd == 2) {
Wire.write("I'm Arduino UNO.");
}
else if (cmd == 3) {
Wire.write("I2C communication");
}
}

タグ
コメントをかく