中心位置の緯度・経度を設定/取得する
最終更新:
 moonlight_aska 2013年09月23日(月) 12:42:44履歴
Google Maps Android API v2 
地図の中心位置の緯度・経度を設定/取得する場合, GoogleMapクラスを利用する.
緯度・経度の設定/取得
- MainActivity.java
- GoogleMapのインスタンスを取得する.
- 地図の中心位置の緯度・経度を設定する.
- CameraPosition#Builderメソッドで, 中心位置の緯度・経度を指定してCameraPositionのインスタンスを生成する.
- GoogleMap#animateCameraメソッドで, 地図の中心位置を設定する.
- 地図の中心位置の緯度・経度を取得する.
- GoogleMap#getCameraPositionメソッドで, カメラの位置情報を取得する.
- CameraPosition.targetから緯度・経度を取得する.
package com.moonlight_aska.android.googlemapv2;
import com.google.android.gms.maps.CameraUpdateFactory;
import com.google.android.gms.maps.GoogleMap;
import com.google.android.gms.maps.SupportMapFragment;
import com.google.android.gms.maps.model.CameraPosition;
import com.google.android.gms.maps.model.LatLng;
import android.os.Bundle;
import android.support.v4.app.FragmentActivity;
import android.util.Log;
import android.view.View;
import android.widget.Toast;
public class MainActivity extends FragmentActivity {
private GoogleMap mMap = null;
@Override
protected void onCreate(Bundle savedInstanceState) {
super.onCreate(savedInstanceState);
setContentView(R.layout.activity_main);
mMap = ( (SupportMapFragment)getSupportFragmentManager().findFragmentById(R.id.map) ).getMap();
}
public void onSetFuji(View view) {
// 富士山の位置:北緯35度21分39秒, 東経138度43分39秒
double latitude = 35.0d + 21.0d/60 + 39.0d/(60*60);
double longitude = 138.0d + 43.0d/60 + 39.0d/(60*60);
Log.v("Map", "latitude = " + latitude + ", longitude = " + longitude);
CameraPosition cameraPos = new CameraPosition.Builder()
.target(new LatLng(latitude, longitude)).zoom(10.0f)
.bearing(0).build();
mMap.animateCamera(CameraUpdateFactory.newCameraPosition(cameraPos));
}
public void onGetCenter(View view) {
CameraPosition cameraPos = mMap.getCameraPosition();
Toast.makeText(this, "中心位置\n緯度:" + cameraPos.target.latitude + "\n経度:" + cameraPos.target.longitude, Toast.LENGTH_LONG).show();
}
}
- res/layout/acvitivy_main.xml
<RelativeLayout xmlns:android="http://schemas.android.com/apk/res/android"
xmlns:tools="http://schemas.android.com/tools"
android:layout_width="match_parent"
android:layout_height="match_parent"
tools:context=".MainActivity" >
<fragment
android:id="@+id/map"
android:layout_width="match_parent"
android:layout_height="match_parent"
class="com.google.android.gms.maps.SupportMapFragment"
/>
<LinearLayout
android:orientation="horizontal"
android:layout_width="fill_parent"
android:layout_height="wrap_content" >
<Button android:id="@+id/btnSet"
android:layout_width="wrap_content"
android:layout_height="wrap_content"
android:text="@string/setBtn"
android:onClick="onSetFuji"
/>
<Button android:id="@+id/btnGet"
android:layout_width="wrap_content"
android:layout_height="wrap_content"
android:text="@string/getBtn"
android:onClick="onGetCenter"
/>
</LinearLayout>
</RelativeLayout>
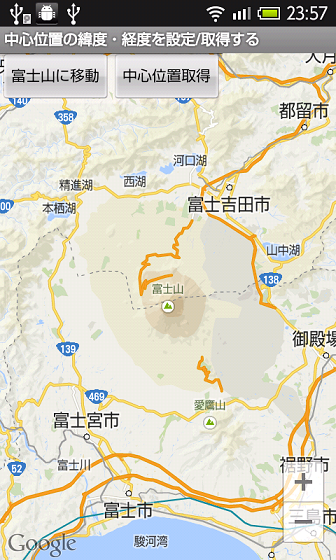
- 動作例
1) 緯度・経度の設定
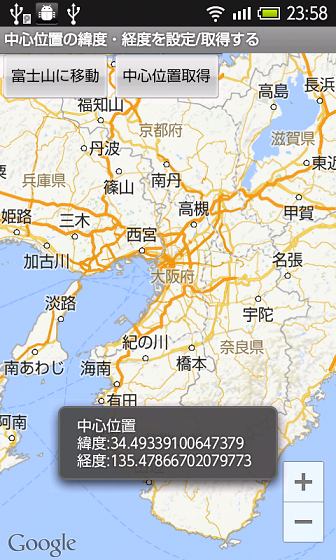
2) 緯度・経度の取得
Google Maps Android v1 API
地図の中心位置の緯度・経度を設定/取得する場合, MapViewクラスを利用する.
緯度・経度の設定/取得
「Googleマップを表示する」を参照し, Googleマップが表示できるようにする.
1) 緯度・経度の設定
2) 緯度・経度の取得

- MainActivity.java
- findViewByIdメソッドで, MapViewのインスタンスを取得する.
- 地図の中心位置の緯度・経度を設定する.
- 中心位置の緯度・経度を指定して, GeoPointのインスタンスを生成する.
- MapController#animateToメソッドで, 地図の中心位置を設定する.
- 地図の中心位置の緯度・経度を取得する.
- MapView#getMapCenterメソッドで, 地図の中心位置を取得する.
- GeoPoint#getLatitudeE6/getLongitudeE6メソッドで, 緯度・経度を取得する.
package com.moonlight_aska.android.web.googlemap02;
import android.os.Bundle;
import android.view.View;
import android.widget.Toast;
import com.google.android.maps.GeoPoint;
import com.google.android.maps.MapActivity;
import com.google.android.maps.MapView;
public class MainActivity extends MapActivity {
private MapView mview = null;
@Override
protected void onCreate(Bundle savedInstanceState) {
super.onCreate(savedInstanceState);
setContentView(R.layout.activity_main);
mview = (MapView)findViewById(R.id.mapview);
}
@Override
protected boolean isRouteDisplayed() {
// TODO Auto-generated method stub
return false;
}
public void onSetFuji(View view) {
// 富士山の位置:北緯35度21分39秒, 東経138度43分39秒
double latitude = (35.0d + 21.0d/60 + 39.0d/(60*60)) * 1E6;
double longitude = (138.0d + 43.0d/60 + 39.0d/(60*60)) * 1E6;
GeoPoint gpo = new GeoPoint((int)latitude, (int)longitude);
mview.getController().animateTo(gpo);
}
public void onGetCenter(View view) {
GeoPoint gpo = mview.getMapCenter();
double latitude = gpo.getLatitudeE6() / 1E6;
double longitude = gpo.getLongitudeE6() / 1E6;
Toast.makeText(this, "中心位置\n緯度:" + latitude + "\n経度:" + longitude, Toast.LENGTH_LONG).show();
}
}
- res/layout/acvitivy_main.xml
<RelativeLayout xmlns:android="http://schemas.android.com/apk/res/android"
xmlns:tools="http://schemas.android.com/tools"
android:layout_width="match_parent"
android:layout_height="match_parent"
tools:context=".MainActivity" >
<com.google.android.maps.MapView
android:id="@+id/mapview"
android:layout_width="fill_parent"
android:layout_height="fill_parent"
android:enabled="true"
android:clickable="true"
android:apiKey="****************************************" <-- Maps APIキー
/>
<LinearLayout
android:orientation="horizontal"
android:layout_width="fill_parent"
android:layout_height="wrap_content" >
<Button android:id="@+id/btnSet"
android:layout_width="wrap_content"
android:layout_height="wrap_content"
android:text="@string/setBtn"
android:onClick="onSetFuji"
/>
<Button android:id="@+id/btnGet"
android:layout_width="wrap_content"
android:layout_height="wrap_content"
android:text="@string/getBtn"
android:onClick="onGetCenter"
/>
</LinearLayout>
</RelativeLayout>
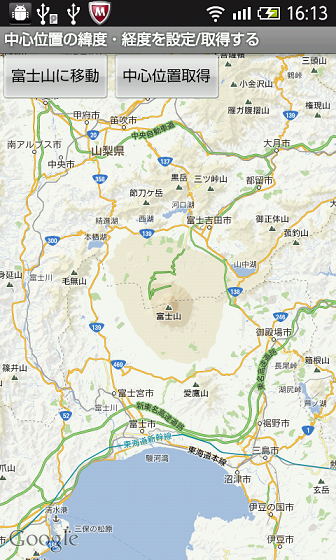
- 動作例
1) 緯度・経度の設定
2) 緯度・経度の取得

コメントをかく