相対指定によりウィジェットを並べる
最終更新:
 moonlight_aska 2011年09月25日(日) 09:29:14履歴
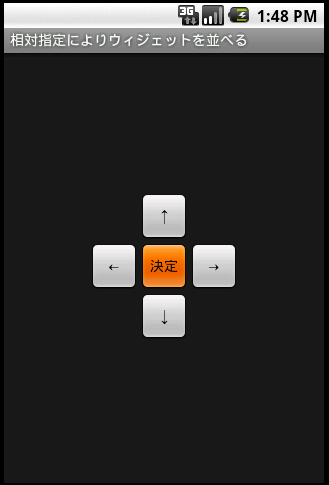
ウィジェットとの相対的な位置を指定してウィジェットを並べる場合, リラティブレイアウト(RelativeLayout)を使う.
相対位置指定する
相対位置指定する 
- res/values/strings.xml
- 表示する文字列を定義する.
<?xml version="1.0" encoding="utf-8"?>
<resources>
<string name="app_name">相対指定によりウィジェットを並べる</string>
<string name="button_top">↑</string>
<string name="button_bottom">↓</string>
<string name="button_left">←</string>
<string name="button_right">→</string>
<string name="button_center">決定</string>
</resources>
- res/layout/main.xml
- RelativeLayoutを定義する.
- 最初に配置するウィジェットは, RelativeLayoutからの相対位置で指定する.
- 以降のウィジェットは, すでに配置したウィジェットとの相対位置で指定する.
<?xml version="1.0" encoding="utf-8"?>
<RelativeLayout xmlns:android="http://schemas.android.com/apk/res/android"
android:layout_width="fill_parent"
android:layout_height="fill_parent"
android:padding="25px"
>
<Button android:id="@+id/button_center"
android:text="@string/button_center"
android:layout_width="50px"
android:layout_height="50px"
android:layout_centerInParent="true" ---- レイアウトのど真ん中に配置
/>
<Button android:id="@+id/button_top"
android:text="@string/button_top"
android:layout_width="50px"
android:layout_height="50px"
android:layout_above="@+id/button_center" ---- 「決定」の上に配置
android:layout_alignLeft="@+id/button_center" ---- 「決定」の左側にあわせる
/>
<Button android:id="@+id/button_bottom"
android:text="@string/button_bottom"
android:layout_width="50px"
android:layout_height="50px"
android:layout_below="@+id/button_center"
android:layout_alignLeft="@+id/button_center"
/>
<Button android:id="@+id/button_left"
android:text="@string/button_left"
android:layout_width="50px"
android:layout_height="50px"
android:layout_toLeftOf="@+id/button_center"
android:layout_alignTop="@+id/button_center"
/>
<Button android:id="@+id/button_right"
android:text="@string/button_right"
android:layout_width="50px"
android:layout_height="50px"
android:layout_toRightOf="@+id/button_center"
android:layout_alignTop="@+id/button_center"
/>
</RelativeLayout>

コメントをかく