地図表示範囲を取得する
最終更新:
 moonlight_aska 2014年01月12日(日) 18:29:50履歴
Google Maps Android API v2 
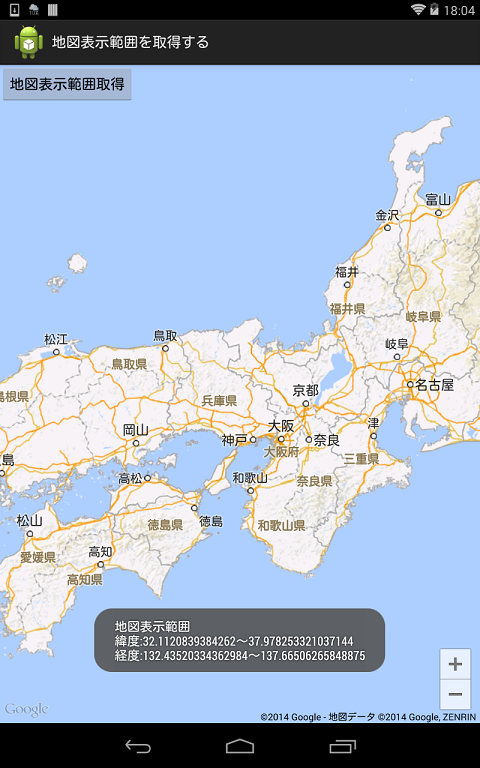
画面上に表示されている地図の範囲を取得するには, VisibleRegionクラスを利用する.
地図表示範囲の取得
「Googleマップを表示する」を参照し, Googleマップが表示できるようにする.
- MainActivity.java
- GoogleMapのインスタンスを取得する.
- GoogleMap#getProjectionメソッドで, Projectionのインスタンスを取得する.
- Projection#getVisibleRegionメソッドで, VisibleRegionのインスタンスを取得する.
- VisibleRegion.latLngBoundsから可視領域の範囲を取得する.
package com.moonlight_aska.android.googlemapv2;
import com.google.android.gms.maps.GoogleMap;
import com.google.android.gms.maps.Projection;
import com.google.android.gms.maps.SupportMapFragment;
import com.google.android.gms.maps.model.VisibleRegion;
import android.os.Bundle;
import android.support.v4.app.FragmentActivity;
import android.view.View;
import android.widget.Toast;
public class MainActivity extends FragmentActivity {
private GoogleMap mMap = null;
@Override
protected void onCreate(Bundle savedInstanceState) {
super.onCreate(savedInstanceState);
setContentView(R.layout.activity_main);
mMap = ( (SupportMapFragment)getSupportFragmentManager().findFragmentById(R.id.map) ).getMap();
}
public void onGetArea(View view){
Projection proj = mMap.getProjection();
VisibleRegion vRegion = proj.getVisibleRegion();
// 北東 = top/right, 南西 = bottom/left
double topLatitude = vRegion.latLngBounds.northeast.latitude;
double bottomLatitude = vRegion.latLngBounds.southwest.latitude;
double leftLongitude = vRegion.latLngBounds.southwest.longitude;
double rightLongitude = vRegion.latLngBounds.northeast.longitude;
Toast.makeText(this, "地図表示範囲\n緯度:" + bottomLatitude + "〜" + topLatitude +
"\n経度:" + leftLongitude + "〜" + rightLongitude , Toast.LENGTH_LONG).show();
}
}
- 動作例
Google Maps Android v1 API
画面上に表示されている地図の範囲を取得する場合, MapViewクラスを利用する.
地図表示範囲の取得
「Googleマップを表示する」を参照し, Googleマップが表示できるようにする.
1)
2)
- MainActivity.java
- findViewByIdメソッドで, MapViewのインスタンスを取得する.
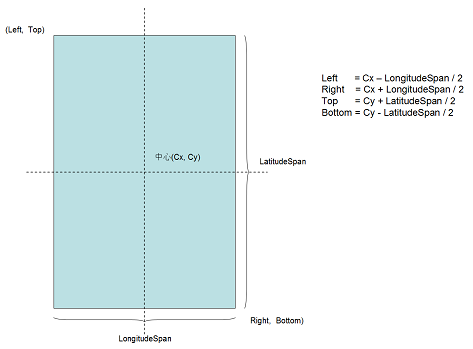
- MapView#getMapCenterメソッドで, 地図の中心位置を取得する.
- MapView#getLatitudeSpan/getLongitudeSpanメソッドで, 上辺下辺の緯度差, 左辺右辺の経度差を取得する.
- 下図のように, 地図表示範囲を計算する.
package com.moonlight_aska.android.web.googlemap03;
import android.os.Bundle;
import android.view.View;
import android.widget.Toast;
import com.google.android.maps.GeoPoint;
import com.google.android.maps.MapActivity;
import com.google.android.maps.MapView;
public class MainActivity extends MapActivity {
private MapView mView = null;
@Override
protected void onCreate(Bundle savedInstanceState) {
super.onCreate(savedInstanceState);
setContentView(R.layout.activity_main);
mView = (MapView)findViewById(R.id.mapview);
}
@Override
protected boolean isRouteDisplayed() {
// TODO Auto-generated method stub
return false;
}
public void onGetArea(View view) {
// 地図表示範囲の計算
GeoPoint gpo = mView.getMapCenter();
double topLatitude = (gpo.getLatitudeE6() + mView.getLatitudeSpan() / 2) / 1E6;
double bottomLatitude = (gpo.getLatitudeE6() - mView.getLatitudeSpan() / 2) / 1E6;
double leftLongitude = (gpo.getLongitudeE6() - mView.getLongitudeSpan() / 2) / 1E6;
double rightLongitude = (gpo.getLongitudeE6() + mView.getLongitudeSpan() / 2) / 1E6;
Toast.makeText(this, "地図表示範囲\n緯度:" + bottomLatitude + "〜" + topLatitude +
"\n経度:" + leftLongitude + "〜" + rightLongitude , Toast.LENGTH_LONG).show();
}
}
- res/layout/activity_main.xml
<RelativeLayout xmlns:android="http://schemas.android.com/apk/res/android"
xmlns:tools="http://schemas.android.com/tools"
android:layout_width="match_parent"
android:layout_height="match_parent"
tools:context=".MainActivity" >
<com.google.android.maps.MapView
android:id="@+id/mapview"
android:layout_width="fill_parent"
android:layout_height="fill_parent"
android:enabled="true"
android:clickable="true"
android:apiKey="****************************************" <-- Maps APIキー
/>
<LinearLayout
android:orientation="horizontal"
android:layout_width="fill_parent"
android:layout_height="wrap_content" >
<Button android:id="@+id/btnGet"
android:layout_width="wrap_content"
android:layout_height="wrap_content"
android:text="@string/getBtn"
android:onClick="onGetArea"
/>
</LinearLayout>
</RelativeLayout>
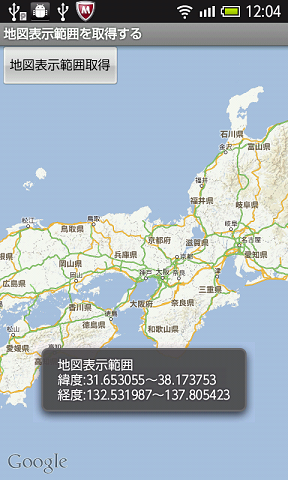
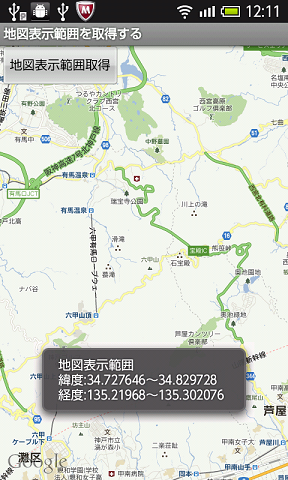
- 動作例
1)
2)

このページへのコメント
色々親切にご指導頂いてありがとうございます。
ですが当方のスキルの無さから全く前にすすまず
ご相談したい事がございます、ご迷惑でなければtakaskb@gmail.com
へメールアドレスなど教えて頂けないでしょうか?
少しだけアンドロイドの構成がわかってきました
私が作成したいアプリを作るには、他アプリが吐いた写真を取り込むため
ContentProviderを利用して(実装して)そのインターフェイスとして読み書き
をCursorLoaderで行いデータとしてSQLiteを使用するという流れなんですね
まだまだ道は長そうですが頑張ります
ありがとうございました
ありがとうございます
試してみます。
お手数おかけしました
askaです.
説明サイトについては特に知りませんが, 以下のようにすればのテーブルの情報がわかりませんか?
for (int i=0; i<data.getCount(); i++) {
Log.v("Media", "ID = " + 0data.getString(data.getColumnIndexOrThrow("_id")));
for (String column : data.getColumnNames()) {
Log.v("Media", column + " = " + data.getString(data.getColumnIndexOrThrow(column)));
}
data.moveToNext();
}
質問ばかりで申し訳ありません
data.getCount() で 使ってるSQLite のデータテーブルの構成がよくわかりません。
このテーブルは既存の物だと思うのですどこかに解説しているサイトなど有りますでしょうか?
多分このテーブの情報にファイルの画像パス及びファイル名称が入ってくるのだと思うのですが
お時間のある時にでもお願いします