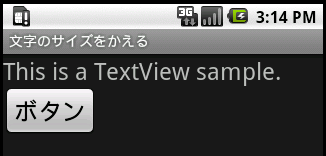
文字のサイズをかえる
最終更新:
 moonlight_aska 2011年05月15日(日) 22:47:09履歴
テキストビューやボタンなどの文字サイズを変更する方法は2通りある.
以下では, テキストビューとボタンの文字サイズを変更しているが, エディットテキストや他のボタンなど文字列を扱うウィジットでは同様に文字サイズを変更できる.
XMLファイルにより設定
コードにより設定
以下では, テキストビューとボタンの文字サイズを変更しているが, エディットテキストや他のボタンなど文字列を扱うウィジットでは同様に文字サイズを変更できる.
XMLファイルにより設定 
- res/layout/main.xml
- テキストビューに表示する文字列のサイズを指定する.
- ボタンに表示する文字列のサイズを指定する.
<?xml version="1.0" encoding="utf-8"?>
<LinearLayout xmlns:android="http://schemas.android.com/apk/res/android"
android:orientation="vertical"
android:layout_width="fill_parent"
android:layout_height="fill_parent"
>
<TextView android:id="@+id/textview_id"
android:layout_width="wrap_content"
android:layout_height="wrap_content"
android:text="@string/textview_label"
android:textSize="24sp"
/>
<Button android:id="@+id/button_id"
android:layout_width="wrap_content"
android:layout_height="wrap_content"
android:text="@string/button_label"
android:textSize="24sp"
/>
</LinearLayout>
コードにより設定
- テキストビューやボタンなどのsetTextSizeメソッドを使って文字サイズを変える. 引数には文字サイズをfloat型のピクセル値で指定する.
package com.moonlight_aska.android.charsize01;
import android.app.Activity;
import android.os.Bundle;
import android.widget.Button;
import android.widget.TextView;
import android.widget.LinearLayout;
public class CharSize01 extends Activity {
/** Called when the activity is first created. */
@Override
public void onCreate(Bundle savedInstanceState) {
super.onCreate(savedInstanceState);
// テキストビューを生成
TextView text = new TextView(this);
text.setText(R.string.textview_label);
text.setTextSize(24.0f);
// ボタンを生成
Button btn = new Button(this);
btn.setText(R.string.button_label);
btn.setTextSize(24.0f);
// レイアウトにテキストビューとボタンを追加
LinearLayout layout = new LinearLayout(this);
layout.setOrientation(LinearLayout.VERTICAL);
layout.addView(text, new LinearLayout.LayoutParams(
LinearLayout.LayoutParams.WRAP_CONTENT,
LinearLayout.LayoutParams.WRAP_CONTENT));
layout.addView(btn, new LinearLayout.LayoutParams(
LnearLayout.LayoutParams.WRAP_CONTENT,
LinearLayout.LayoutParams.WRAP_CONTENT));
setContentView(layout);
}
}

コメントをかく